

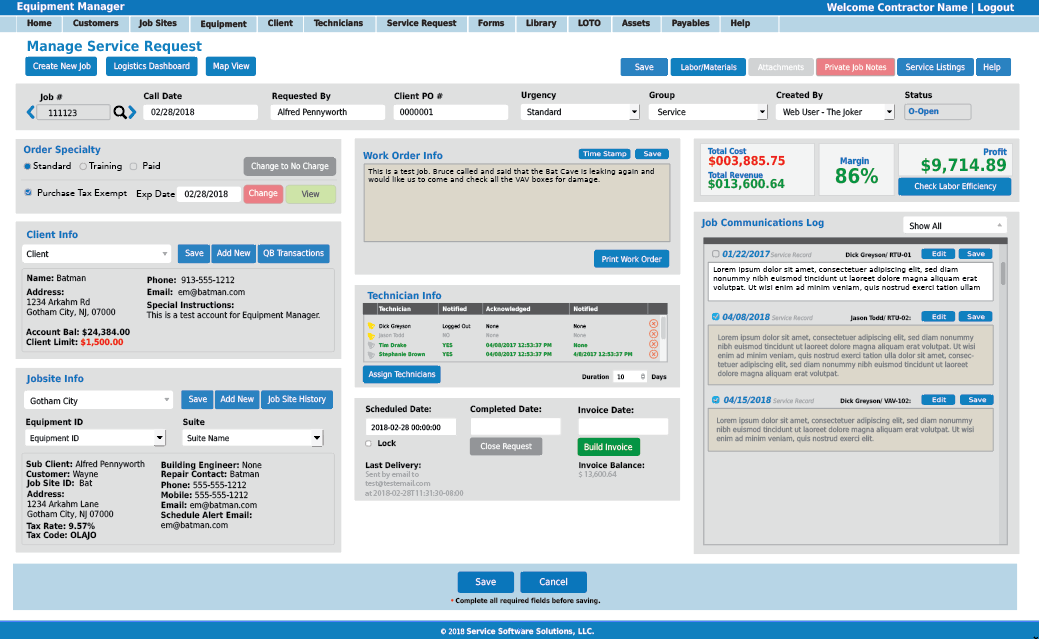
Probably the most utilized and vital page on the web in Equipment Manager is the Service Request page. This page is where all jobs are created, assigned, and tracked. From start to finish the process begins and ends with the Service Request page. In fact, this page has grown so much that other subpages have been created to support the Service Request. The following is a breakdown of all the aspects of this page. Additional material is available if needed in regards to setting up a job, understanding aspects of the Job process and the key elements in closing a job out.
The Service Request as it’s known before the job is started, is also referred to as a Work Order while the job is being performed by the Technician from the mobile side that may contain Job Numbers throughout the process. A Service Request #, Work Order # and Job # are all three the same thing. To make things easier going forward we are going to refer to scheduled work as the Job.
A Job starts with intake from the Service Request page on the web. A Customer or Client will call or communicate with the Contractor the need for work to be done. It is important to understand that we are making the assumption that the caller is already in the system, otherwise before a job can be created the new caller needs to provide information that will be gathered and a new Customer, Client and Job Site will have to be created before starting the Job intake. Once all this information is entered into the system the web user can now create the job.
All work has to be put into a Job in Equipment Manager before it can be dispatched to the Technicians. This process is done through the primary Service Request page. Once all the required information is entered on this page and a Technician is assigned, the page can be saved which will send the Job to the Technician on the scheduled date. At this point the Job is classified as Open and waiting for the work to be done.
Once the Technician preforms all the needed work, he/she will be required to submit all the related information about the work done, items used, items purchased, time spent on the job through their mobile device. This process will collect all the necessary information back to the Service Request screen. Once the Technician(s) have completed their work, a Service Record will be entered into the system where the last Technician on the Job will identify the Job as Closed. If for some reason the Technician fails to close the job, it can be closed from the Service Request page. This information is then archived in the appropriate places as according to the type of record or fee that is being recorded.
Once the Job is complete, the process starts to bill the client for all the work and materials that have been used to complete the job. All the information is automatically updated and gathered by the system and relayed to the Labor/Materials page. This page is accessible from the Service Request page of any Job and is a type of overview to auditing the final invoice that will be sent to the Client.
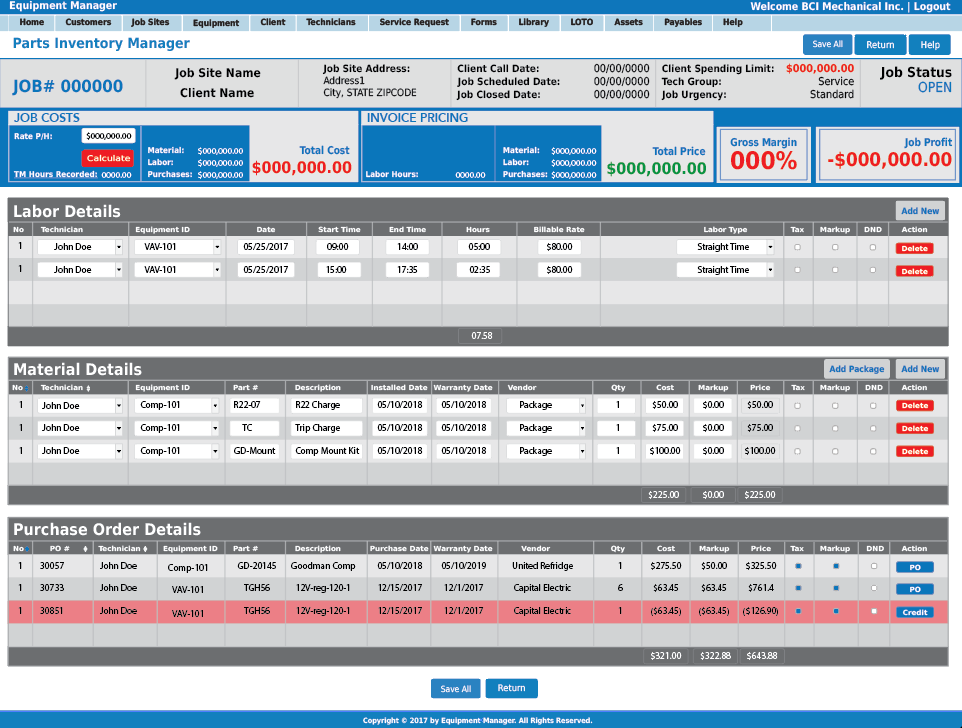
The Labor/Materials page allows the authorized web user the ability to view and edit all the time and material charges that have been collected as a result of the information that was put into the system by the Technician in the field. The page also allows the web user to add/remove items as needed to adjust the resulting Invoice to be where it needs to be to properly bill the Client for all services conducted by the Contractor. In addition, the page shows how all the charges are compiled and put into totals that are used to compute the Gross Margin and Profit numbers for the Job.
Once everything is ready, the web user can return to the Service Request page and preview the Invoice before sending the Invoice via QuickBooks Online to the Client. This action marks the Job as Invoiced in the system. From that point the Invoiced request can be monitored from the Service Request listing and page along with QuickBooks Online to see when the invoice has been Paid. Once the Invoice is paid by the Client, the Job is considered complete and is no longer tracked.
Top Right Buttons

- Service Listing – button links to the Service Listing page where all orders can be scrolled.
- Download Files – No function at this time.
- Reports – Pops a screen for setting filter to generating a multi-functional report.
- Help – Loads the help page for the Service Request page.

- Labor/Materials – Opens the Labor Materials popup screen to view invoice edits.
- Attachments – Allows the web user to attach documents to the Job screen.
- Job Notes – Pops a window showing all service record notes related to Records, Inspections, Evaluations, and Replacement forms.
- Job Site History – Pops a list of all jobs that are related to the jobsite of the current report.
Top Left Buttons

- Create New Job – Creates new service request.
- Logistics Dashboard – Opens the four logistics screens.
- Calendar – displays jobs on a monthly calendar with the ability to move jobs dynamically from one day to the next.
- Dispatch Grid – Shows which jobs are on which technician for any given day.
- Fleet Tracking – Shows the location of any tech at the current time on a google map.
- Dispatch Map – Shows the location of all jobs that have been assigned to a specific date.
- Map View – Shows the current Job Site on a Google map.
Service Request Information Box

- Job Number – Shows the assigned number of the current job.
- Call Date – Field to insert the date for when the client called.
- Requested By – Who placed the call for service.
- Client PO# - Reference for a Client PO # for Invoicing purposes.
- Urgency – How fast does the job need to be done.
- Group – What contractor group classification does the job fall in. This list can be edited in the contractor profile.
- Created By – Who created the Job. This can be a mobile user, or web user. If a mobile user created the job, this field will be prepopulated with the mobile user’s name. If unassigned, the web user that created the job needs to select their name from the list.
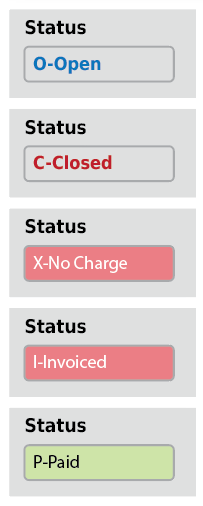
- Status – Whether the job is Open, Closed, No Charge, Invoiced or Paid.
- Open - This means the job is scheduled, techs are currently doing work on the job.
- Closed - This means that all technicians have completed all work on the job.
- No Charge - This is a classification for jobs that have been closed and are NOT to be billed to a client.
- Invoiced - Jobs that have been Invoiced to the client but are not paid.
- Paid - Jobs that have been invoiced to the cliend and have been paid in full with a balance of $0.00.
Order Specialty

This section helps the web user define the type of job that is being created. Most jobs fall under the Standard setting.

Some standard jobs can be tax exempt if for some reason there is a need to have an exemption certificate.

In that case, the tax exempt check box needs to be checked and a Tax Exempt Certificate needs to be uploaded.

In other cases, the job may be training, a training job is obviously not billed to any client, but the hours that are gained by the technician for training purposes may be paid or unpaid depending on the type of training.

No Charge Jobs

The last specialty is No Charge. This is for jobs that are normal jobs assigned to a Client, but might not be billed for reasons of Quotes or Warranty work. In order for a job to be marked as No Charge, the job has to be first closed. Once the job has been closed by either the web user or Mobile user, the No Charge button will display and be available to click. Any Job that is No Charge will NOT be available to send to QB for billing the Client.
Client Info
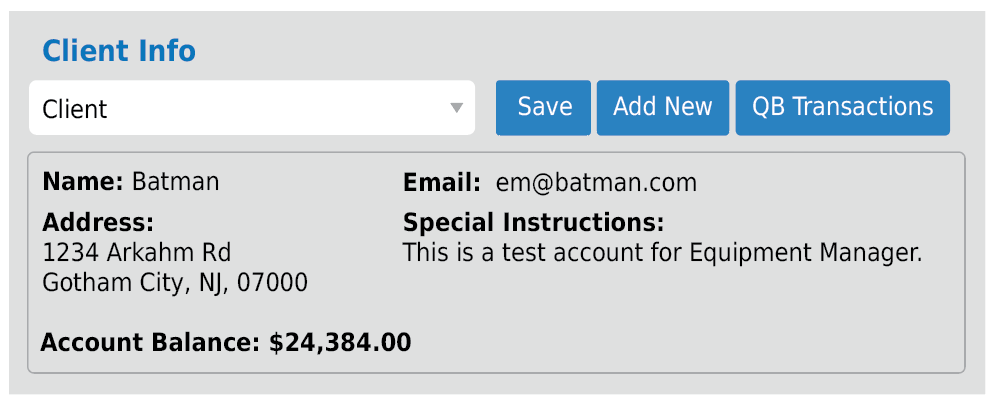
The Client Info box shows all information about the client that relates to the job. The drop menu allows the web user to select and change the client. The box is a requirement to save any job. Buttons to the right also give the web user the ability to save a new Client if needed. Adding a new client needs to be done with care as to make sure that the Client you are looking for is not already in the system under a spelling variation.
Job Site Info

The Job Site info like the Client info allows the web user to choose a required Job Site, and specify equipment and a suite as needed. The Job Site and Equipment fields are required. The Suite field is optional.
Work Order Info
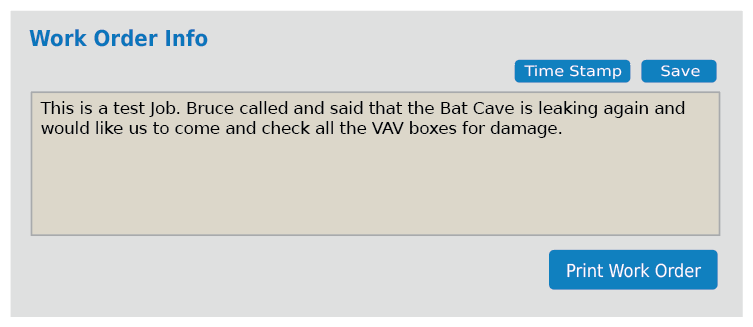
The Work Order Info section is where the web user should input any notes or instructions that relate to the job that are deemed necessary for the mobile user to perform the work needed. Once the original notes are put in and the page is saved the text field will revert to a edit/save entry system to be able to input updates to the field.  The text box also follows the new tan/white color scheme of tan boxes are visible to clients while white boxes are not. Clicking the Print Work Order button will allow the web user to print off a paper/pdf work order containing all Job # Notes, Labor and Material details.
Print Work Order
The Work Order is a text document that gives information about the job, who the client is, what the jobsite is, what equipment is being inspected and worked on. This document can be used at the beginning of the job as a way to assign the mobile user work by paper format. It can also be a form of invoice as a way to pass invoicing information to the Client once the job is complete. This is not a complete list of services as the current Work Order does not contain any PO information related to the job.
Technician Info
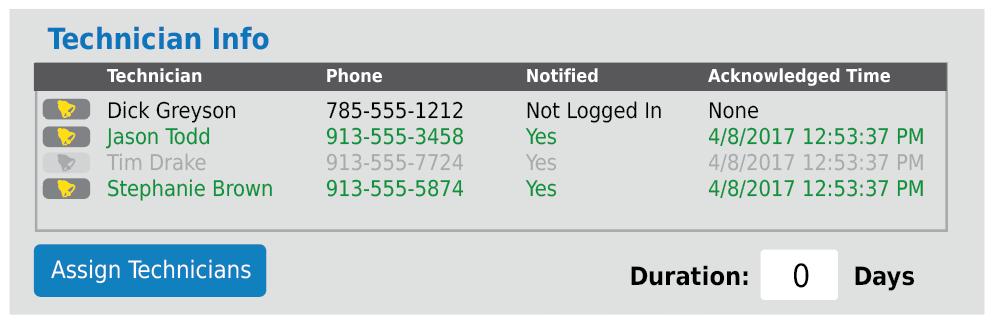
This box shows who is assigned to the job site to complete the work order being created. The web user will click on the Assigned Techs button and from the list, check the technicians that need to be assigned to work on the job. If at any later date the web user wishes to unassign a tech from a job it can be done by opening the tech listing and un-checking the technicians name from the list. However, unchecking a techs name from the drop menu will not remove the tech from the box, the tech is simply no longer assigned to the job and his name will be greyed out. This will allow a record of who has ever been assigned to the job.
Accepting the Notification
The Acknowledged Time field will also be cleared every time a new notification is sent. This clearing of the field will reset the Acknowledged Time back to none until the mobile user receives and clicks the OK on the mobile notification screen. As previously, the clicking the OK on the notification screen will populate the Acknowledged Time field with a time stamp showing he got the notice.
Unassigned and Notify Button
If the tech is unassigned or completes his work, the tech will then become greyed out. The notify button will also show greyed out and no longer active.Setting the Duration of a Job
Some jobs may take more than one day. Up to this point if a job goes beyond 1 day, the job will fall off the technician’s mobile device unless the web user changes the scheduled date to the next day. We have fixed this issue with the addition of the Duration Days field under the Tech Info box. One represents the assigned date while two will mean the day after and so on. This will be used by the mobile device in calculating the Previous Jobs Assigned section of the Overview screen in Time Manager.
Date Box

This section will contain three dates with options. The first is the schedule, this box is required for the job as to when the job needs to be done. This schedule date tells the system when the job will show up on the mobile user’s phone to be started.
The lock option allows the web user to lock the date. This means that if a mobile user tries to self-assign the job to himself before the scheduled date, the mobile system will notify the mobile user that the date has been set for a reason. The lock feature will NOT keep the mobile user from changing the date, it simply provides a warning that the date was set for a reason and advises the mobile user to read any job related notes for reasoning.
Completed Date is when the job is complete. If the job has been finished, the job can be closed by one of two ways. First is by the web user clicking on the Close Request button below the Completed Date box. This button will only show up if there are no Technicians currently working on the job. (Green highlighted names in the Tech Info box) Pressing the Close Request button will change the job status to Closed.
The second way is if the last active mobile user assigned to the job fills out a service record and states that the job (all work) has been completed and no more work is to be performed. If that is the case, then the job will also be changed to show as closed and a date stamp will show in the Completed Date box.
The last box is the Invoice Date, this box is populated when the web user chooses to send the job to QB via email to be invoiced. In order for the job to be invoiced, the job must be closed. Once the job has been successfully invoiced, a date is displayed in the Invoice Date box. Invoiced jobs can no longer be assigned to a mobile device. Once the invoice has been paid, the Save buttons for the Service Request screen will no longer be visible locking out all future edits to the job.
Margin / Profit Box
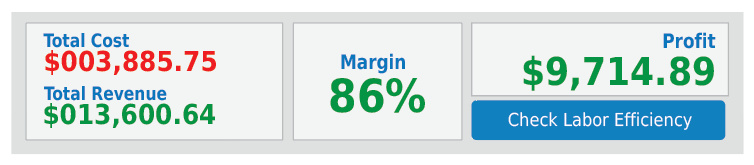
This box shows the overall gross performance of the job. Total Costs and Revenue are displayed along with Gross Margin and Profit. Numbers are color coded by positive and negative values. The values are computed based on the average tech salary pulled from the contractor profile until a more accurate average is entered into the Labor/Material screen.
Job Communications Log
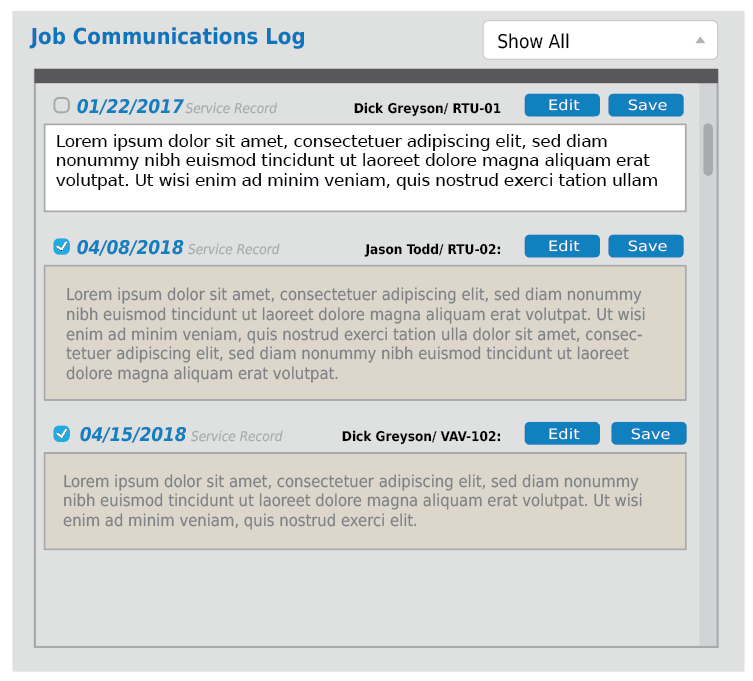
This box shows all notes that have been entered by the mobile users for inputting Service Records, Inspection forms, Replacement Request, and Evaluations. Each entry shows the date of entry, the type of entry, the techs name, and the Equipment ID that the entry was assigned to. The web page will allow the mobile user to edit any entry and then save their edits. You can also uncheck any entry that you do NOT wish to show up on Client invoices. These notes boxes follow the Client visibility color schemes of tan means the client can see the text, white means they can NOT see the text.
