

Time Manager
Time Manager Module is designed to track time for employees paid hourly within the Equipment Manager Mobile App. The module allows employees to punch time at the start of each job and gives a live accurate breakdown of the employees working hours for the day and work week. The web side of Time Manager allows Contractors to compile working hours in real time, track overtime, and also log Vacation, Sick, and Personal time if needed.
There are currently four sections to Time Manager on the web.
Overview & Analysis, Submission & Approval, Daily Time Editing and Time Off Requests.
Overview & Analysis
This page allows the contractor to see what is happeing with his mobile users in current time and also see total accumulations of time and labor for the current week. The data can be sorted out by category and also allow the contractor to view data from the previous weeks if desired.
The Overview and Analysis page is broken down into three sections, Company Weekly Information, Techs on the Clock, and Current Technician Totals.
Technicians on the Clock
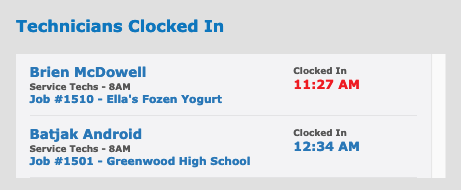
This section shows all technicians that are currently logging time in the current week, what their current status is, what job they are on, and when they started the current job.
A couple of factors go into this section; one is that it reports the latest information the cloud server has available. If the tech is at a location that does not have data service, this section will only report that last punch that the mobile device was able to send to the server.
This section only shows punches for the current date. If the user is currently on Vacation, PTO, or Sick, they will now show up in this listing. As seen above, the data will show you the techs name, category, Current Job Number, Job Site Name and the time the user made the punch. In most cases the information should be accurate and give you an idea where each mobile user is and what they are doing.
Company Weekly Totals
This section is designed to give the Contractor up-to-date hours’ information based on the selected week. The time boxes are calculated to include time from the last punch to the time of page load. This allows you to account for all users currently on jobs. These boxes give the Contractor a compiled account for the following:

Regular Hours is the first 40 hours of each techs work week. This is based on the category profile on when the week starts.
Overtime is the number of hours for each tech after 40 hours are accounted for the current week. Any hours over 40 are included.
Break Time is calculated based on the number of breaks recorded by the system and what the duration of a break is set at. The system does not record actual break durations. Only the equivalent of how many were taken at the maximum amount of time available for a break by the tech according to the tech category profile. Breaks do NOT effect the users time. They are paid and the mobile does not make any special punch in the system for breaks. Clicking the break button on the mobile only records that the button was pressed and starts a basic countdown time on the phone for the users benefit.
Paid Hours are everything that is paid out to the technician. Regular, Overtime, Holidays and Sick. Lunch and End of Day time are not paid and therefore not included.
Time Hours are how many hours the system has recorded all mobile users on any legitimate job. This includes Regular and Overtime hours and should be the sum of those hours.
Labor Hours are calculated using information outside of Time Manager and is the total of all Service Labor hours recorded during the current work week.
Labor Efficiency is calculated by taking Time Hours and dividing Labor Hours. This shows how close the contractor is to billing for all hours worked.
This will become more helpful as the week progresses. The closer you get to 40 hours the more critical the information.
Current Technician Totals
This section is sorted by Tech Category, Work Week, and can be organized by aspects such as Last Name, or how many hours they have. Each line shows the Tech’s Name, Payable Hours accumulated, graphs showing Hours worked and Service Hours recorded, and a short breakdown of Regular, Overtime, and Break Time accumulated by user. This information is all based on the current work week.

The techs Time Hours accumulation it shown in Green next to his name taking into account the current job the tech is on up to the current time of web page load. Links to view/edit the techs daily time (View Details) and also to an efficiency report that will compile for the specified technician based on the specified week selected.
At a glance, you can see from the bar graphs on this page if the technician is being efficient in recording Service Labor (Orange) to meet his Time Clock hours (Green). The Contractor can view the Efficiency Report and see in more detail where hours are not being recorded so they can be corrected and properly billed.

If the user exceeds 40 hours, the green bar will turn red showing you that the mobile user is exceeding 40 hours and is now in overtime according to the system. To the right, the system will display the current total amount of overtime that has been recorded in red type.
Submission & Approval
This section is used by the web user doing payroll to track submitted time for previous weeks. From this screen the web user will be able to see that all mobile users have submitted time, the compiled time details per user and if the user has been paid for the week. This page can be sorted by Tech Category and be set to show any work week.
Time Submission
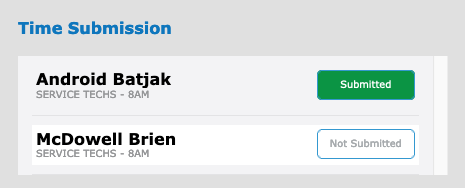 The Time Submission section shows all techs and wither or not they have submitted time for the work week. The second section shows Time Approval. You will see either a blue outlined button telling the user the mobile user has NOT submitted their time, or a green button designating that the user has submitted time. The button will not show submitted unless the mobile user has submitted ALL time for the designated week. If for some reason the user has not submitted time or is not able to submit time for the designated week, the web user can click on the Not Submitted button and Submit the time for the mobile user.
Time Approval
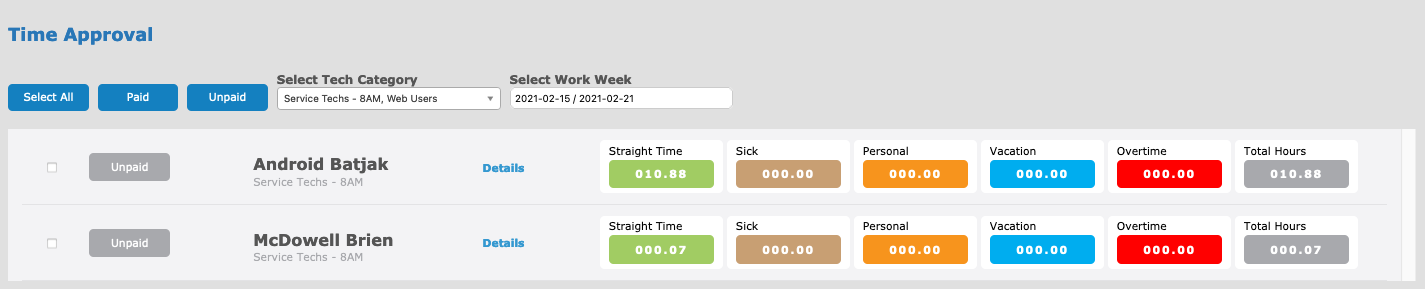
The Time Approval section allows the payroll manager to specify if the time for the week has been paid or not. Equipment Manager does not have a built-in ability to pay users, but it can and does allow the web user to log if the function has been done. Each user listed tells the payroll manager who they are, wither or not they have been paid for the selected week, and list details about how much Straight Time, Sick Time, Vacation, Overtime have been recorded. It also offers a Details link to edit and fix time for the selected week.
Creating Payroll Report
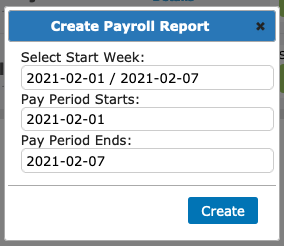 When all the weeks’ time has been finalized, the web user can then click on the Create Payroll Report button in the upper right. This is going to trigger a popup that is going to ask you to select the work week you want to run the report on. This report is based on the total number of weeks you have configured in the Contractor Profile – Time Settings page. Once you have selected any date from within the desired week. The system will populate the popup with the week, start date and end date. The user can then click the Create button.
The system is then going to generate an Excel sheet that will break down all the time data into two parts. The left part will define the hours in Regular and Overtime by State and Custom Zones. In additional it will show hours for Sick and Vacation hours if the user has logged any approved time off for the designated work week.

On the right, the system will break down all time hours by day of the week. This will explain how the hours recorded on the left were spread out over the weekdays. The left and right should add up to be the same.
Payroll Settings
There are a couple of settings found on the Contractor Profile – Time Settings page. These in are located on the bottom half of the page and include Time Reporting, States to Include, Custom Zones, Show Special Time and Holiday Time. These settings need to be configured before running a time report.

Pay Week Begins will tell the system what day of the week the contractors work week begins on. This currently can only be Sunday or Monday.
This needs to be set to the day of the week that starts the weekly pay period. (Usually Sun or Mon) Even if you pay your Technicians every two weeks, the pay week is still defined weekly because Overtime must be calculated on a weekly basis. What day of every week does the week and hour count start over?
Weeks In A Pay Period
defines how many weeks are in the Contractors pay period. (Usually 1 or 2)You need to define which States the system needs to record your mobile technicians will be performing work in. Any state that a Job Site resides in that is not stated, the hours worked will show up in a General column. For tax purposes you need to include all states that you do work in.
Certain cities and geographical areas have Custom Tax Zones that have to be excluded from general state taxes. Major cities are usually an example of this and all work hours that occur in that zone must be separated and excluded from general state hours. To do this simply create a zone and label it to match your city or special area. Any work performed at a Job Site located in a zip code that resides in this zone will have the hours worked separated out from the corresponding state zone and add to the custom zone. Multiple custom zones with the same zip code will see a copy of the hours duplicated between custom zones. Any hours that are displayed in custom zones will not be shared or shown in state zones. As a contractor you need to check with your payroll supervisor and see if any custom zones need to be created and if so you need to provide Service Software Solutions with information about which city or zone needs to be created.
Special Time is based on approved availability and usage. Hours accumulated under special time are not used to calculate overtime. Using the checkboxes associated you need to specify which types of special time you would like to see reported.
- Vacation - Specify the displaying of Vacation time on the report.
- Sick - Turns on and off the displaying of Sick time on the report.
- Holiday - Specify the displaying of Holiday time on the report
Holidays are recorded by Time Manager but are not displayed though the mobile device. They are also not currently blocked by the Service Request page as work may still need to be performed on an observed holiday. Holiday hours are included in the Time report and are added to the Technicians weekly hours but are NOT attributed to overtime and are added after overtime is calculated by the system.
Holidays are set by the Contractor and account for eight hours per holiday. Every day off for holiday must be accounted for in the table on the Contractor’s profile table. (Multiple days around Christmas must be separated out.) You will need a list of all holidays that are observed by the company and what their dates are. In some instances, the dates will change yearly. The Contractor will be required to visit this section of the profile at the beginning of every year and adjust any dates that change.
All of these options must be set up by the contractor before attempting to generate a payroll report. Once the settings have been entered. The web user can then attempt to generate a report.
Daily Time Manager
The Daily Time Editor section allows the web user to make edits directly to the punches that have been recorded by the mobile users. This is where the web user can view the individual punches for any mobile user for any day.
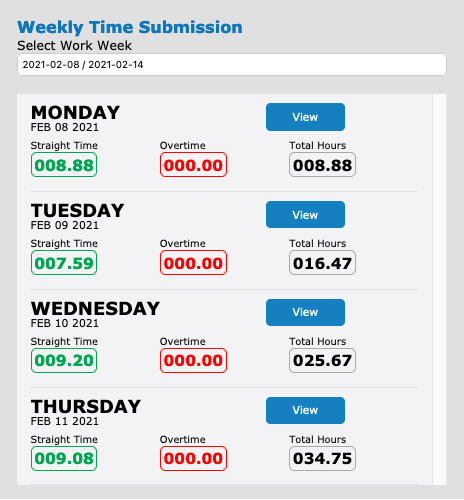
Weekly Time Submission
Weekly Time Submission breaks down time by day and shows hours a mobile user has accumulated for each day of the current work week by Regular, Overtime, and Total Hours. The web user can change the week being displayed on the page at the top of this section. To the right of each day is a view button that will change the page information to the left to reflect the selected day and show all punches that contribute to the day totals displayed on the left.
It is important to note that you will not see days of the week where the user has NOT entered a punch. If you need to add time to a day where the user does not currently have any time punches, you will have to create the first punch for that day from another day and just make sure you change the date of the punch to the proper day. Once up have created a new punch on the new day, you can refresh the screen and you will see the day show up.
Current Weeks Totals
The current totals for the week section at the top on the right shows total accumulation for the week that has been selected and also compiled hours for sick, vacation, and PTO for the tech. These three options of Sick, PTO and Vacation will only show up if they are enabled in the Contractor Profile. Currently they will show the web user, how many hours the mobile user has taken in the current year cycle, how many hours are currently scheduled and how many hours are remaining if an allotment has been set.

To the right of this, you will see buttons for Add Time and Edit Vacation. Clicking on the Add Time will allow you to add a Time Punch for the user. Clicking the Edit Vacation will allow you to edit the total number of hours the user has been allotted for Vacation for his current employment year.
Daily Time Submission
The last section is the Daily Time Submission. This is a breakdown of a single day’s punch submissions from a user’s mobile device. If you desire, you can change the day to any day of the work week by clicking the View button to the left under the Weekly Submission section.
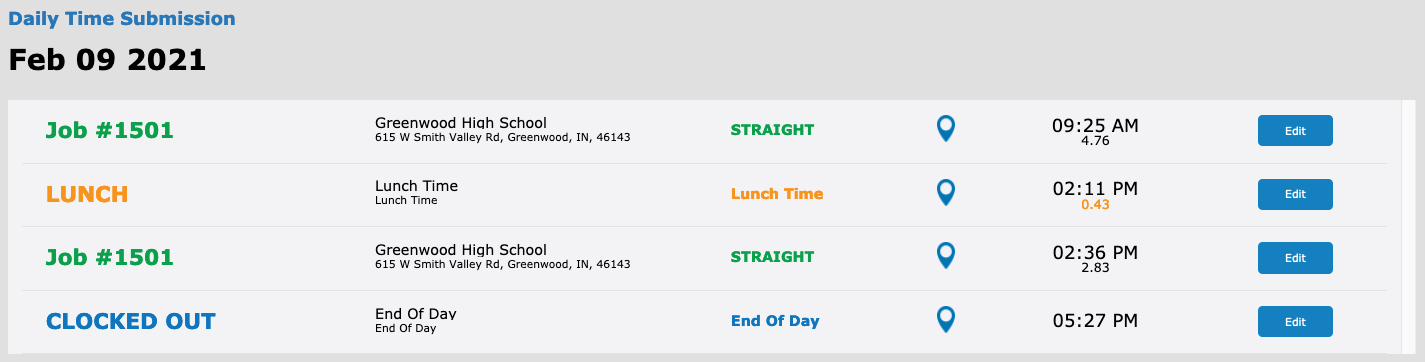
Each row of the Daily Submission section represents a single punch entry. Each row will show the mobile user the Job Number, Job Site name and address, Time Category type (Straight, Lunch, End of Day), a geo pin allowing you to click and see the location of the user when they entered the punch, the punch time and job durations. The system will only show the durations between punches. This means that the last punch recorded will never have a duration.
Editing Time Punches
The Daily Time Editor screen is where you can also create edit and delete a punch. By default, adding and editing punches will always be tagged to the date displayed under the Daily Time Submission sub-title.
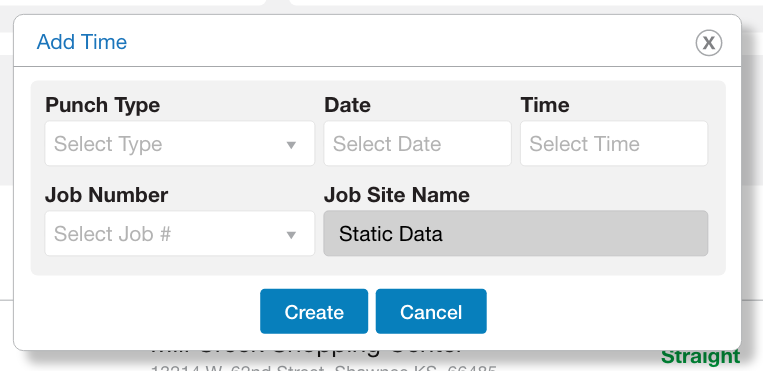
If you wish to add a punch, you can do so by clicking the Add Time button on the right side of the page. Please be aware that when you click the button and the Add Punch popup shows, it will default to the date you are currently viewing on the page, NOT the current date. When the Add Time popup is displayed, you will be able to select the type of punch you desire to create (Straight, Lunch, End of Day). Once you have specified the type, you will have the option if you are creating a Straight punch to select the Job Number. The Job Site field will be automatically populated based on the Job Number. If you are creating a Lunch or End of Day, a special number is preset.
Once you have selected your punch type and job/job site as needed, you will then select a time and date, the date will be preset based on the page you are adding from. You do have the option to select any date.
Editing a punch is much the same process. Select the day and then find the punch you wish to edit and click the Edit button to the right. The system will not stop you from making any changes to the punch with the exception that you cannot have two punches for the same user on the same date and time. You can change straight punches to Lunch and End of Day punches as desired and vise versa. You can also remove a punch from the system by editing the punch and clicking the Delete button.
If you remove a punch, that punch is gone for good. In order to meet the requirement that no two punches are the same date and time, the system does not disable punches. This is also the reason that punches must be deleted one at a time.
Requesting Time Off
Equipment Manager allows the technician to make an electronic request for taking Vacation, Sick, PTO and Bereavement days off. These requests can be viewed one of two ways, by calendar and by listing. To get to the Time Off Calendar, you need to go to Main Menu/Employees/Time Off Calendar. The time off listing page can be found by navigating to the Daily Time Editor screen and clicking the link in the upper right for Time Off Requests.
All requests are entered into the system with a Status of Suspended. This simply means that the request has not been Approved or Denied by a member of the office management. When a technician submits a request, the system will email the manager that is assigned by the techs category profile. This email will inform the manager that the mobile user has requested time off and provides a link for the manager to go directly to the Time Off Request page to approve or deny the request.
The mobile user has access to view all requests that have not seen their schedule date pass. If the requested day off has not arrived or passed, the tech has the ability to view the request, its status, and edit the number of hours that have been requested for that day.
Time off requests are used by the system to compile time off for each mobile user when the Payroll Report is generated for each week. All hours that apply to the week of the report and have been approved in the system will show up on the report in the appropriate columns if the time off type has been assigned to the report. Hours that are still suspended or have been denied will be ignored by the Payroll report. The report will also display Time Off hours under the days of the week section.
Time Off ListingThis page is made up of two parts, on the left of this screen you will find a listing of all the requests that have been submitted to the system. These requests are sorted chronologically by the date submitted. You can resort this table by clicking on any of the table column headers.


To make edits to a request, simply click on the View Request link to the right side of any request line in the table. This will load the request data in the box to the right of the screen. All requests can then be edited from this box. In addition to this, request can be approved without opening the request up. This can be done by simply changing the request status in the table on the left.
Time off requests can be edited by the web user regardless of the status. Once the requested date has passed, the request is no longer valid as it will not be included on the payroll report, but the request is still stored by the system.
The Requested Date is when the user is asking for the time off. The Hours is stating how many hours for the day request is the user being asked to request off. The mobile does not assume the user is taking a DAY off, the user could just be asking to take time off for an appointment.
When the user makes a time off request in the mobile the phone will require the user to enter Notes as to why they are asking for the time off, this might include who they asked about taking time off and their reason. If they are asking for Sick or Bereavement off, it might be policy to upload a photo in the Attached Image showing a doctors notice or obituary clip.
The Time Off Code is the category of Sick, Personal or Vacation. It is up to the web user to change the Status of the request from the default of Suspended to either Approved or Denied. When the status is changed, the web user can add a Response note to the request explaining the updated status. This response can be view by the mobile user on their device.
Time Off Request Calendar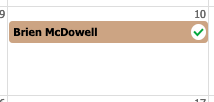
The calendar is a quick way to view the upcoming request, assess the ability to grant requests and then quickly change the status of the desired request. The calendar will allow you make edits to requests by clicking on the calendar events. This will open a edit request popup that will let you edit the request and add response notes as needed. The calendar can be sorted by Status, Leave Type, Tech Category and by Technician(s). The requests are color coded on the calendar by Sick (Brown), Vacation (Blue) and Personal (Orange).
As a bonus feature you can select requests on the calendar and drag them to a different date if needed to change the date requested.
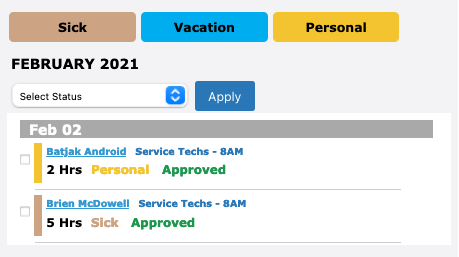
On the right of the Calendar is a listing of all the requests that have been received for the month. These requests can have their status changed in mass by selecting the request you want to change and then selecting the desired status at the top and clicking Apply. You can also edit the request and add notes as needed by clicking on the requesting users name. This will open a edit request popup that will let you edit the request and add response notes as needed.
Time Efficiency Reports
The time system allows the contractor to run efficiency reports that help the contractor assess how well the mobile users are billing their time verse the time they are on the clock. This report can be run in a number of ways. There are links for it on the Labor Material popup and Time Manager Overview page in the form of preset links. In addition, you can run a custom report from the Time Manager Overview page.
Lab/Mat Popup
When you open the Labor/Materials popup for any job that has time/labor accumulated, the contractor may desire to see how efficient the mobile users are being with their time verse billing that time to the job. The Labor Material popup allows the contractor to see all the different job elements to view so Costs and Revenue are visible in one place.

On the left of the top box, you will see the Costs that are being accumulated for the Job. This includes the TM Hours (Time Hours). On the right, you will see the Pricing or Revenue the is being estimated. The Labor Hours are what is billed to the invoice as a total for all mobile users assigned.
The Contractor or web user can click on the TM Hours text and the system will generate a labor report that will show a comparison of hours spent on the clock verse the hours that were billed by the tech as labor hours. All these entries are sectioned up by date and then by user. This can be helpful to see where there may be issue with labor not being entered or time being wasted.
Time Manager – Overview & Analysis
When you navigate to the Time Manager page, there are two types of efficiency reports that you can access. The first is the user report for the week. This is generated automatically and can be found by finding the desired user under the Technician Tools sections and looking to the far right. Clicking on the Efficiency Report text link will open a preset Efficiency Report based on the tech and the current week. This report will tell the Contractor how efficient the tech is being in logging his hours for the week as labor compared to the time hours recorded.
The report will inform the Contractor at the top how efficient the tech as for the week and then break down each day, compare the labor to the time entries and rate how efficient the tech was for each day. Jobs and Time Punches are hyperlinked to allow the Contractor to click and view more details as needed.In addition, you can run a custom report by clicking the Efficiency Report button at the top of the Overview & Analysis page on the right. This will launch a popup that will allow the web user to create a customer report. The custom report can generate two distinct reports, the first is a custom efficiency report, the second is a custom hour’s report.
Efficiency Report
Each report can be specified by Type. Tech reports will break the report down by jobs and dates. Job Number reports will break the report down by techs and days. Job Site reports will break the report down by Techs and Dates. The web user can then specify how the reports are Sorted By. These are Date, Technician, Tech Category, Job Number, Job Site and Client.
Service Record Hours on an Efficiency Report can be sorted two ways. This is based on the labor hours reported. When a technician fills out a labor record, the hours reported to the job may not be correct in terms of the hours that the Contractor wishes to bill the Client. If the hours are not correct, the web user (Account Manager) might choose to increase the hours the tech reported or decrease them by changing the hours on the Lab/Mat. When this happens, the system does NOT actually change the hours on the record, but instead records the new adjusted hours against the record so that the system can retain what the tech originally reported. When you create a custom report the labor hours can be specified as the hours listed by the tech or the modified hours billed.
Payroll Hours Report
The second option is a Payroll Hours report that will break down each technicians’ hours for a specified amount of time. This report allows the Contractor to see a breakdown of where the hours are being spend based on Class and State/Custom Zones. This will allow the Contractor to then use the numbers provided to get a better account for the value of the mobile user’s time spent working on jobs under each of the Job Classes.
The Contractor can set the report to compile hours from any Date Range. Once a range has been defined, the Contractor can then specify the Technicians that are to be shown. A specified number of Classes can be chosen to break the report down. The Contractor must then select a State to use when searching for time based on Job Site locations. If a Custom Zone is available, it may also be selected to further limit the search.
