The proposal system will allow the Contractor to create a proposal for work done that can them be sent to the Client for review and approval. This proposal will allow the Contractor to list charges under a specified piece of equipment in the system. These charges are then sent via the web and email to the Client where the client can then log into the web and approve or not the charges for the work being proposed. Once the Client has responded to the proposal, the system will then take action based on the response. If the Client Approves any of the charges and does NOT request a Resubmit then the system will create a Service Request that will contain the needed details from the proposal. If the client at any point requests a Resubmit, the system will email the Account Manager and Estimator to inform the of the need to edit the Proposal per the Clients wishes.
Proposal Manager
This module will consist of two main web screens, a contractor settings screen, and a number of customer interaction screens and emails. While the screen layout and concept are relatively simple, the screens will be pulling a lot of information together keep the web user informed with the proposal process. The system will have a number of hidden link encrypted screens that will be generated automatically and linked via email to the Client for displaying information and capturing input from the Client. Proposals will be generated by the system as a result of any number of mobile user interactions. These include Action Reports, Service Records, Inspections and Replacement Requests. The web user will also be able to create a stand-alone proposal.
The Proposal Process
The proposals created within Equipment Manager will follow a number of steps in a process as they are intended to be used within the system.
Survey Manager Tie-In
The Contractor will be able to pull up and view a list of all Action Reports that are generated through the Survey Manager by the system based on the inspection responses from the field mobile users preforming custom equipment inspections. Once those reports have been received and generated by the system, they will instantly create a proposal and the Contractor will be able to assign inspection issues (Action Items) to a Proposal for replace or repair. The system will automatically assign all Action Items from a single job (All Inspections combined) into one report and Proposal that will be tied to the Job/Contract. The Contractor will have the option from the Action Report to assign any issue to a separate new Proposal as needed. This is all handled from the Action Report feature found in the Custom Survey Module.
Service Record Tie-In (Updated)
The service record that is generated from the mobile user has a question screen at the end of the submission stage that asks the mobile user a number of questions about the equipment and the work being done. One of the questions is Generate Proposal Yes/No. If the mobile user selects Yes, the system needs to create a Proposal for the equipment in reference. This proposal needs to contain the Equipment ID, Client, Job Site and include the Notes from the service record in the Proposal Item included. If a proposal already exists for the job, the system needs to add an item to the proposal with the information from the Service Record, equipment ID, Inspection, Component and inspection notes. The Service Record PDF file needs to be added to the Proposal files table.
Inspection Report Tie-In (Updated)
The inspection report that is created by the mobile user needs to allow for creating a Proposal when the mobile user answers the question “Are any repairs required for this Equipment item?”. If the mobile user answers Yes, the system should then ask the mobile user “Is a proposal required?” if the mobile user answers Yes, the system needs to create a proposal for the Job No. and equipment. If a proposal already exists for the job, the system needs to add an item to the proposal with the information from the inspection, equipment ID, Inspection, Component and inspection notes. The inspection PDF file needs to be added to the Proposal files table.
System Replacement Form Tie-In
The mobile user has the ability at any time to create a Replacement Form for any single piece of equipment. We will need to adjust the replacement form submission to include once the form has been submitted, the system will create a Proposal case to correspond to the request for replacement. This will allow the Contractor to track the progress of the replacement.
Proposal Setup
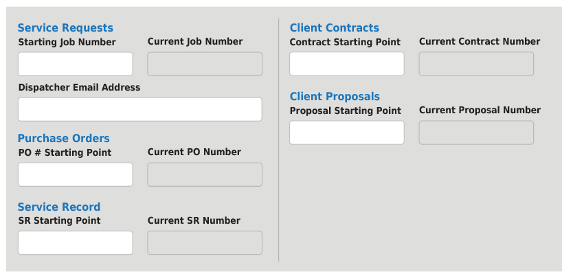
We will need to add a Client Proposal starting point and current number field to the Contractor Profile – Service Settings page. This will allow the contractor to define the starting number for proposals.
Accessing Module
The Action Report will have a link to take the web user to all tied-in Proposals. The web user will also be able to click on the Proposal Manager Icon that will be located on the Main Page and also access Proposals through the Main Menu via the Service/Proposals menu option.
Repair Proposal Listing
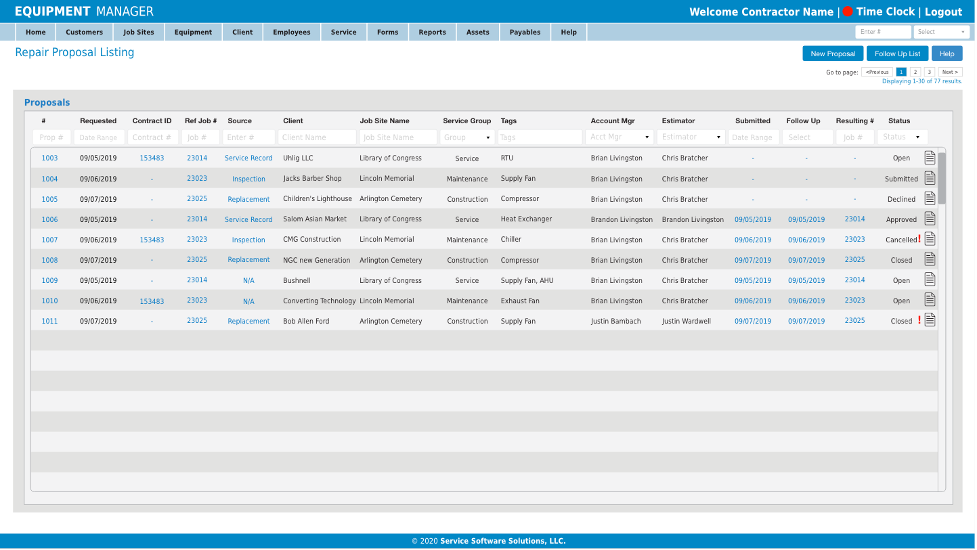
Access to the Proposal Manager will take the web user to the Repair Proposal Listing page. This screen will list all proposals ordered by proposal number. The list can be searched by a number of different related topics. The listing will put the Proposals in order by created date, the most recent to the top.
The listing will provide the user will key information about when the Proposal was created, submitted to the client, any relation to contracts, replacement forms, and any follow up dates that have been set.
Understanding the Listing Page
The following list will break down the Repair Proposal Listing page giving definitions of columns found on the page. This page is designed to show all proposals that have been created in the system. The list will be limited to 30 proposals per page. The proposal are ordered by proposal number. Largest number to the top of the listing page.Requested Date
This date is based on when the request was made. This would be the created date of the request. The field at the top of the column should allow the user to define a date range by specifying a start and end date.
Contract ID
This applies if the Proposal was generated by an Action Item from a Contract Inspection. Action Items create an Action Report that will automatically feed into a Proposal. Clicking the contract number will open the contract page.
Reference Job #
What was the job number that the issue or replacement request originated from.
Source
The column is the document type of the source of the proposal. This is where the original proposal request comes from. This can be one of four sources. Service Record, Inspection Report, Replacement Form, Custom Survey and N/A for manual creation.
Client Name
The Client who is assigned to the Proposal and is responsible for the Job Site and Suite.
Job Site Name
The location of the equipment that is being serviced or replaced by the proposal.
Service Group
The category that is assigned by the Contractor to the proposal.
Tags
Tags can be assigned to the Proposal to allow the contractor to sort and search for key words as desired.
Account Manager
The AM is assigned at the Job Site level and will be prepopulated based on the Job Site. The AM can be reassigned to the Proposal manually by the Contractor.
Estimator
The Estimator is assigned at the Job Site level and will be prepopulated based on the Job Site. The Estimator can be reassigned to the proposal manually by the Contractor.
Submitted Date
This is the date that the Contract is emailed to the Client. This date is auto filled when the Contractor sends the Client notice via the Email Proposal box. The field will be updated with every use of the Email Proposal box.
Follow Up Date
This field will display the date of any follow up that has been assigned to the Proposal. The Contractor can assign the system to email the account manager to follow up with the Client about the Proposal. If this is set up, the system will display the date that the email has been requested. Clicking on the date will show the web user the details of the follow up email.
Resulting Job (New Job #)
The Resulting Job is the Service Request that has been created by the system when the Client has approved a proposal with at least one charge as being Approved and no charges have been set for Resubmit.
Status
The status field will change with certain aspects of the Proposal.
•- Open - The Proposal will be OPEN when it is created until the Contractor sends the first email. •
- Submitted - The proposal will be SUBMITTED any time the Contractor sends an email to the Client. •
- Declined - Anytime ALL the Charges are DECLINED by the Client, the Proposal shall be changed to DECLINED. •
- Cancelled - The proposal can only be CANCELLED by the Contractor by manually setting the Status. •
- Resubmit - If the Client chooses to resubmit any of the charges on the Web Prop, the system will change the status to RESUBMIT. •
- Approved - If the Client chooses to Approve any single charge and NO charges are set to Resubmit, then the system will change the status to APPROVED.
Important
The important icon (
Notes Icon
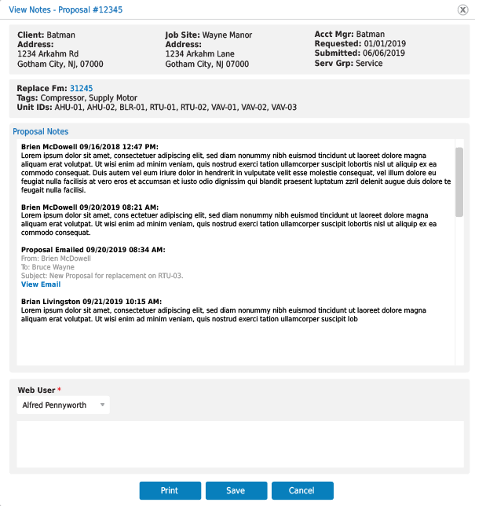
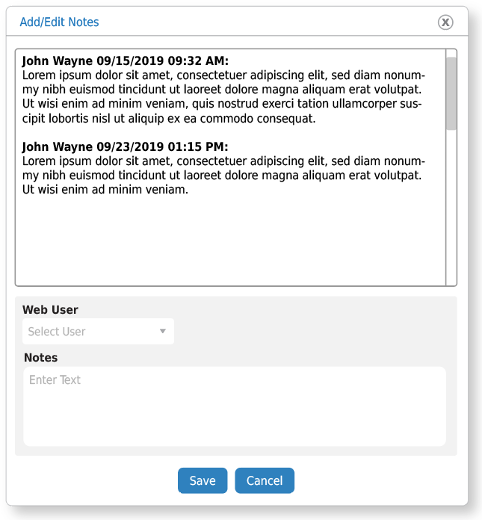
 The notes icon will allow the Contractor to view a popup that will give detailed information about the proposal. This popup will show the Contractor information about the client, Job Site, Replacement Forms and information about the equipment and tags related to the replacement. The popup will also list all active notes about the replacement that will show the web user all the information that has been added to the account. Notes are attached by user and time stamped. The web user will be able to add notes to the account from this popup.
We need to make sure that all notes are DateTime stamped and there is a space between each entry as they are displayed. In this instance, it would be beneficial to have a separate table for notes. The system will also log all emails that are sent by the system related to the proposal in the notes. Email data including a DateTime stamp, to, from, subject and a link to view the email in a separate tab need to be recorded to the notes.
Create Repair Proposal
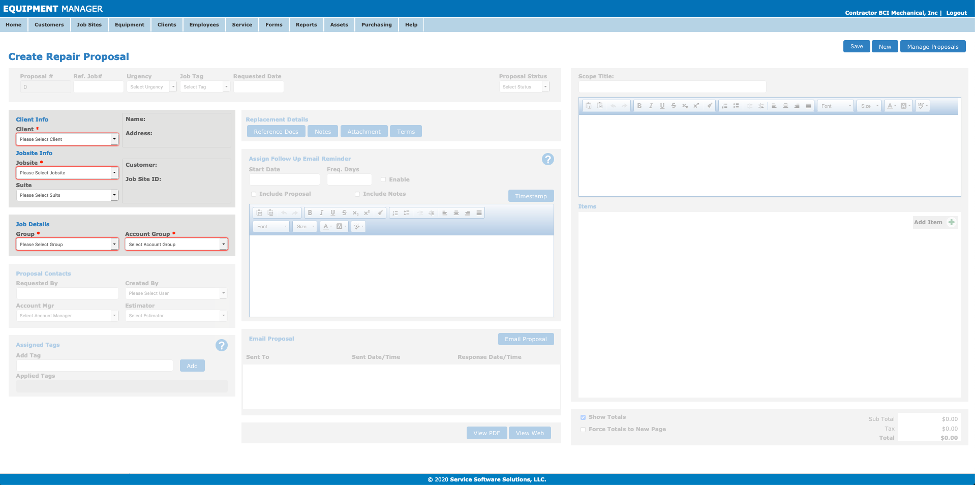
When a proposal is opened up, the user will be taken to the Create Repair Proposal page. This page will be loaded with information about the proposal, equipment and client/Job Site that the proposal pertains to. Like the Contract and Service Request page, the proposal page will contain enough information about the Client and Job Site to be able to create a new Service Request automatically as needed. This will include basic information about account details, Client info, Job Site info and Suite. This information will be used when the Client pushes an approved proposal back and the system will then automatically create a Service Request as a new job to complete the needed approved repair or replacement work.

This page while looking complex should be simple to compile with basic understanding. The page will be broken down into three sections. The left will establish job information, the middle allowing the user to track proposal emailing, related files and notes. The right side is where the web user will add all information related to building the actual proposal.
Creating New Proposal
When the web user chooses to create a new proposal from the prop listing page, the system will require the web user to enter some basic required information before the system will assign a proposal number and allow the user to move forward with building the proposal. This is because there are certain things, add files, notes and proposal items that require a proposal id before they can be created.
Once the web user has entered the correct data, the system will create the new proposal and assign a proposal number and id. At this point the user will gain the freedom to edit the proposal as desired.
General Information
Across the top of the screen is the general information box. Like the Contracts and Service Request page this box houses information about general things related to the proposal that could be job related.

Proposal #
The number is issued by the system and will be defined by the starting number that the Contractor chooses from the Contractor Profile – Service Settings. This number will automatically increase as proposals are generated by the system.
Ref. Job #
This will be the job number that the Proposal work was referenced from. This would be the job that the Replacement form was submitted from or the job that the inspections we completed from that cause the Actionable issue that generated the proposal.
Urgency
This drop menu will contain options for Emergency, Standard and Urgent. If the proposal is marked Urgent, the system will mark the proposal in the listing with a red exclamation point!.
Job Tag
Like the Service Request, Job Tags can be applied to the Proposal to help the web user better code work.
Requested Date
When the Proposal was first created. This field will be auto populated by the system.
Expiration Date
This field tells the user when the proposal is set to expire. This is based on the date that is assigned to the Client when the Proposal is first sent via email. This field is auto populated by the system based on the date selected in the Email Proposal popup window.
Resulting Job #
This field is auto populated when the Client Accepts the proposal. The system will create a new Service Request upon acceptance. The Service Request Job number is displayed and linked to the screen.
Status
The status field will change with certain aspects of the Proposal.
Client Info Box
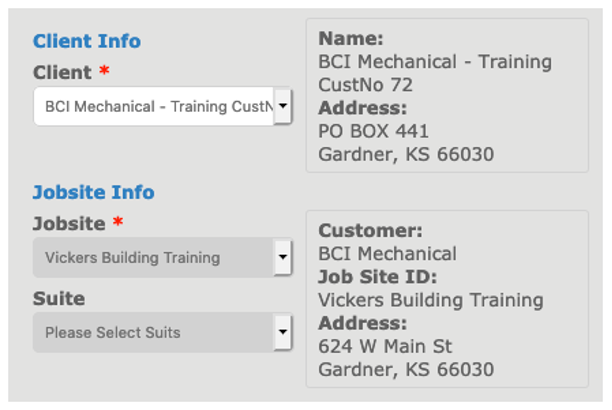
The client info box contains all the info related to assigning the Client and Job Site to the proposal. This information will generally be prepopulated by the system based on the job that the proposal was generated from. The Client and Job Site are required fields for the proposal to be saved. The Suite field is optional.
Some important things to remember about these fields.
- Once a proposal item has been added to the left side of the screen, the client, job site and suite fields will be locked down. The system will NOT allow the web user to change the Job Site once items have been added because the items are assigned to equipment which is assigned to the Job Site and there for can NOT be changed.
- The web user WILL be able to change the Client. The Client list once the Job Site has been locked will display ONLY Clients that have been assigned to the required Job Site.
- Suites will only show those that are part of the displayed Job Site.
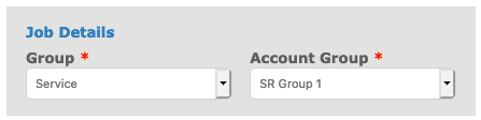
Job Details Box
The job details box contains QuickBooks classes that are related to the job you will created from the proposal. These fields are generally populated by the system based on the job that the proposal was generated from. The web user will be able to adjust them as needed.
Group
What service group do the jobs created by the contract fall into. This field should source and display the same options that are used on the Service Request page.
Account Group
What accounting group will all the job invoices be assigned to via the Invoice created by QBO. This field should source and display the same options that are used on the Service Request page.
Assign Tags Box
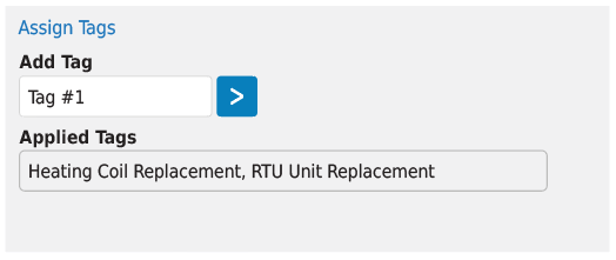
New to the Proposal page is the ability to assign custom tags. These single or multi word tags will be created by the web user to allow the user to define key words that will be associated with the Proposal and Account. The words will be stored and show up in the listing allowing the web user to search the words for all proposals that have common words assigned. Each tag is unique to each proposal and are not sourced. The web user can add as many or few words as needed.
Replacement Details Box
This box will contain buttons that will launch popups to collect and display information pertaining to the Proposal.

Reference Docs
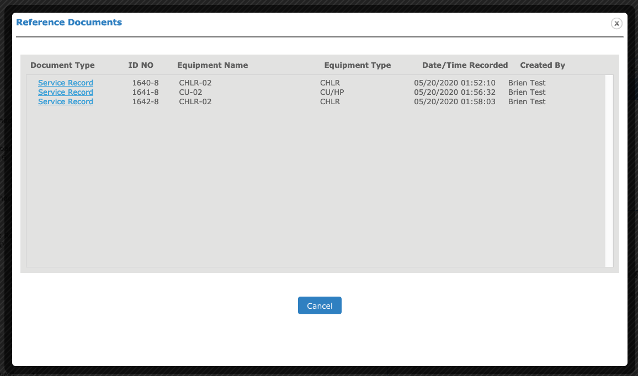
This button will open a popup that will show the web user ALL the equipment forms that have been summitted from the source job related to replacement requests. Each line item represents a proposal request from the field related to any piece of equipment that a mobile user has trigger a request from.
All equipment will be listed in the Proposal Items section on the right of the page. These request for proposal could come from any Service Record, Inspection, Action Report or Replacement Request related to any piece of equipment on the Job Site. The mobile user can make more than one request from the same related piece of equipment. If more than one request comes from the same piece of equipment, the equipment will only be referenced the first time in the Items list but all requests will be listed in the Reference Docs popup.
If the proposal is created by the web user, there will be NO reference documents in the popup.
Notes
The notes box will launch the notes popup that was discussed in the Listing page. This notes box will display basic information about the Proposal and allow the web user to see and add notes as needed.
Attachments
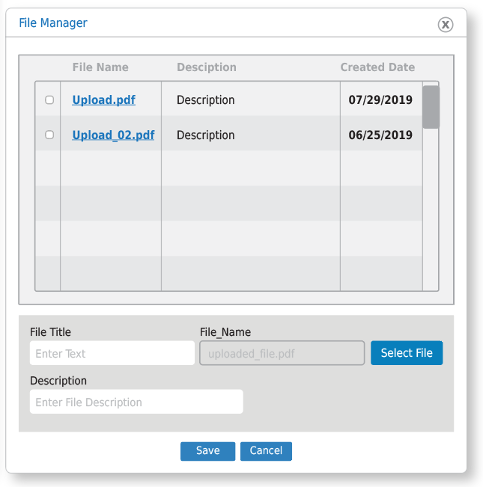
The attachments popup will allow the web user to upload files that are related to the proposal to the system. The button will launch a popup box that will allow the user to select and edit and rename files that are uploaded. All files will be stored in the appropriate directory. When a proposal is attached or an additional request for proposal creation is created the related Service Record, Inspection, Replacement or Action Report PDF needs to be added to the file list by the system. Only one proposal per job number needs to be created and if one already exists in the system then the related new request PDF needs to be added to the existing proposal.
Terms & Conditions
Part of the process for the Proposal will be the Contractor will email the Client a document that contains the content of the Proposal. This document can be transmitted by link to a web page that will allow the user to click and view the proposal on the web or the Contractor can opt to send a PDF copy of the proposal to the Client. In both options the document will contain a terms section at the bottom of the page. This text will be preloaded by the system from information collected on the settings page but can be edited by the web user and customized for any Proposal.
Understanding the Proposal
The proposal is a list of work or options to perform work that is being sent to the Client by the Contractor for approval. This work can stem from a number of reasons. It may come from issues that were found while the contractor was doing routine inspections, or could be based on an issue that was discovered or appeared that caused a mobile user to generate a replacement request. Proposals can also be created from scratch and may have been requested by the Client directly.
In any event, the Contractor will list out all work that will need to be performed. This work is sectioned off by equipment that the work is related to. Once all the work has been listed, the Contractor will have to assign pricing to the work informing the Client the costs involved in having the work completed. This information is saved as a proposal and sent to the Client via email. Once the client reviews all the work options, the client will choose to Approve or Deny the work that has been proposed. This is done on a line by line basis.
The actions of the Client to approve or deny the work requested will tell the Contractor if the work will be performed. Once the Contractor has answers from the Client, the contractor will then generate a Service Request work order to have all approved work completed in the field by the mobile users.
Proposals as stated above can be generated by the system in cases where a Request for Replacement, Inspection, Service Record or Action Report was created. When these actions happen the system will automatically generate a proposal that will list the equipment related and the issue(s) that have been identified. The Contractor will then have the option to customize a list of options for addressing the issue or replacement of the equipment.
In the case of a mobile issue creating the proposal, the system will do a number of things when the mobile user submits a valid reason for creating a proposal.
- The system will look to see if a proposal for the related job number already exists. If no, create proposal. If Yes, the system will amend the existing proposal with additional information related to the current mobile request.
- Create a proposal item with information related to the current request. This will be demonstrated below.
- Attach a copy of the current issue request to the proposal file table so the PDF shows up in the file manager for the proposal. The Replacement Details button will link to the original request that created the proposal. All additional requests will be listed under the attachments popup.
Examples of Items created based on requesting type.
Assign Follow Up Email Reminder
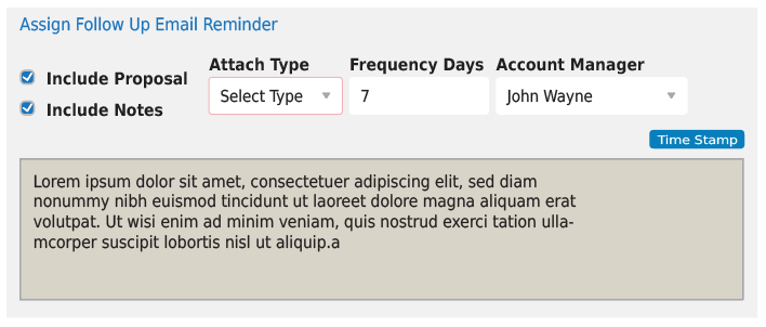
The process of building a replacement and getting it approved may be a long drawn out process and may require communication with the Client on a number of subjects. The box will allow the Account Manager to request that the system automatically generate an email that will remind the Account Manager to follow up with the Client. The email that is sent by the system will have information including the proposal and notes that have been entered via the notes button included or linked. This will allow the Account Manager to follow up with the Client.
Include Proposal/Notes
Checkboxes are given to allow the Account Manager to define if the system should include a copy of the Proposal or any notes that have been collected about the Proposal.
Attachment Type
The Account Manager can define if the system should attach the notes and proposal as a PDF or link the PDF to the email.
Frequency
How often should the reminder email be sent out. This will be triggered from the point in which the reminder is set in the system.
Account Manager
IF more than one manager has been assigned to the Job Site, the manager to receive the notifications can be defined.
Text Box
This box will allow the web user to add any notes that they want to show up with the email sent to the Account Manager.
Email Proposal
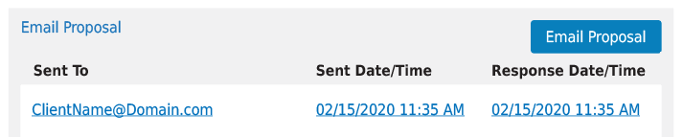
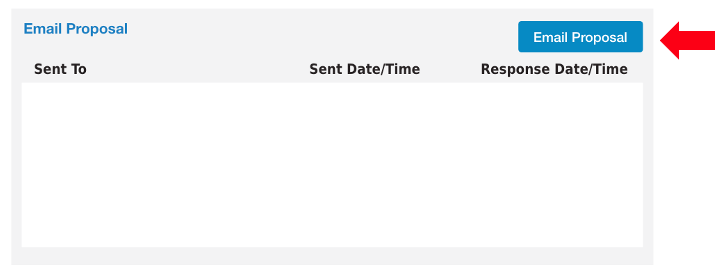
The email proposal box will allow the web user to see when the proposal was emailed to the client and when the client approved the proposal returning results. This box is simple in showing who was emails, when and when the response was recorded. Clicking on the sent to email will launch a new email in the web users email program. The Sent Date/Time stamp will be linked to the PDF file of the proposal that was compiled and sent to the Client. The Response Date/Time stamp will be linked to the Response results PDF that the system generates when the Client accepts/declines the proposal.
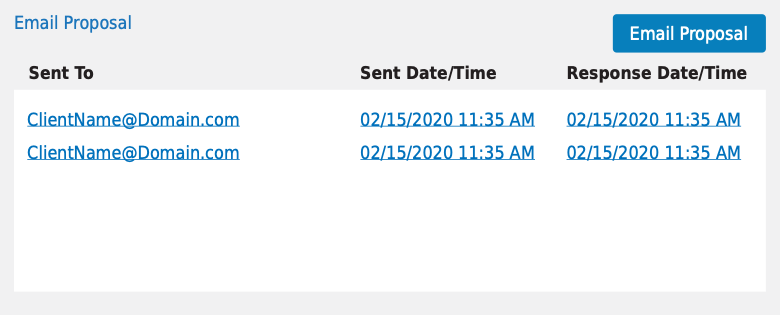
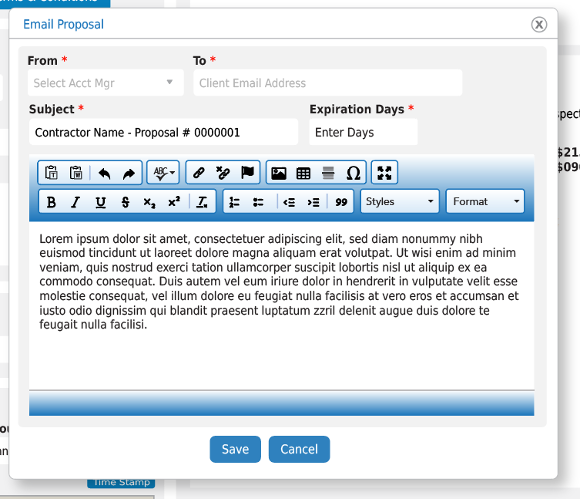
Clicking the Email Proposal button will trigger the process for emailing the Client the latest proposal. This will launch the Email Proposal popup. See Later explanation.

The Email button will launch a popup that will ask the ¬web user to complete emailing info before emailing the client recipient an email that will inform the client of the proposal and give them the option of downloading a PDF copy or viewing the web version in which they can interact and respond immediately with. The web user will be asked to provide details in the email popup by selecting the account manager, supplying an email address for the client, adding a subject line and defining the number of days that the proposal is good for. In addition, the web user will input information into the body of the email as needed.
The save button will allow the web user to save all the relevant information to the proposal.
Proposal Mock Up
On the right side of the screen is the mockup of the Proposal. This is where the web user will see all the details of the proposal as they are applied. These details can be manipulated by the web user to change the data of the proposal as needed. The mockup is divided into three sections. Those section are the Scope, Items/Charges, and Totals.
Proposal Scope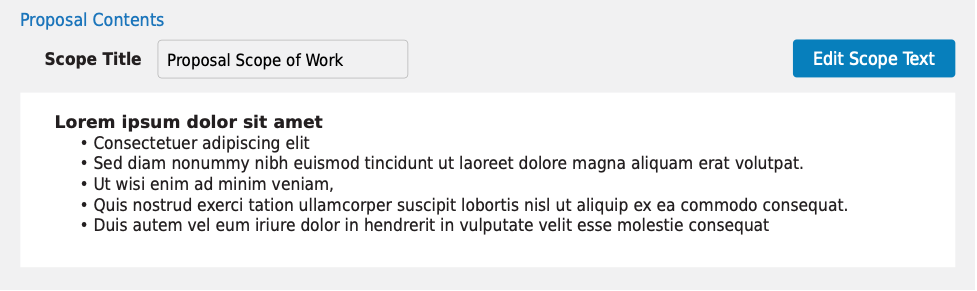
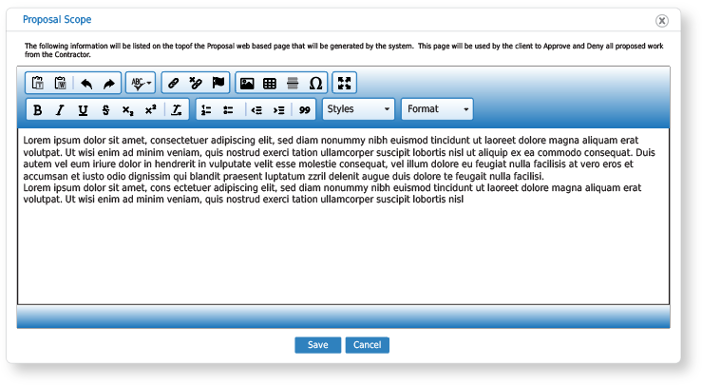
At the top will be the title and scope text. This is where the Contractor will provide any information needed to describe all the details as needed for the proposal. This box can be as short or long as needed. The visible box on the page will not expand but will scroll. A button in the upper right will launch a popup allowing the web user to edit the scope in greater detail.
Items/Charges
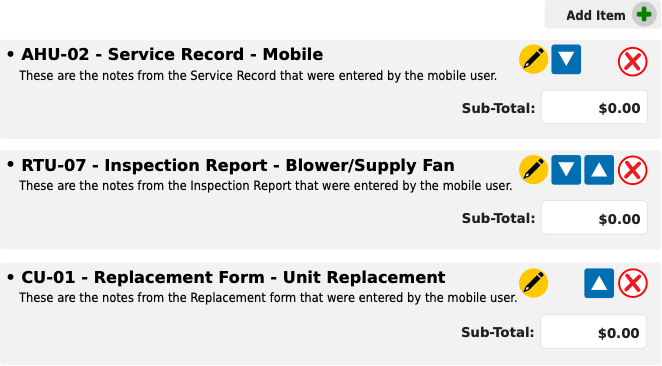
The items and charges section is where the web user will spend most time building the proposal. Items will be generated by the system when the proposal is generated by a mobile request. Requests by mobile users through Service Records, Inspections, Replacements and Action Reports will cause basic items to be generated and added to the proposal. Otherwise the web user is responsible for creating and editing the items and any related charges.

This section can be fully manipulated as needed. The web user has the option to add as many or few items and charges as needed.

Items and charges can be added through the Add Item button in the top right of this section. Clicking on the button will cause the Item/Charges popup to appear allowing the web user to create a new item and related charges.

The web user can also edit an item or its related charges by clicking the Yellow Pencil Edit icon to the right of the Item Name. This will cause the Item/Charges popup to load the item and related charges and allow the web user to edit the information.

The web user can position the items and their related charges by changing the order of the items to be shown. This can be done by clicking the available up and down arrows to the right of the item name.

If the user wishes to, an item and its related charges can be removed and deleted. Once this is done, the item and charges are gone for good. If the removal Red X is pressed a simple popup will show warning the web user that they are attempting to remove the item and by doing so the item and its charges will be deleted for good. “You are attempting to remove this item and its associated charges from the Proposal. If you press “Continue” the item and its charges will be deleted permanently.”
Items & Charges Popup
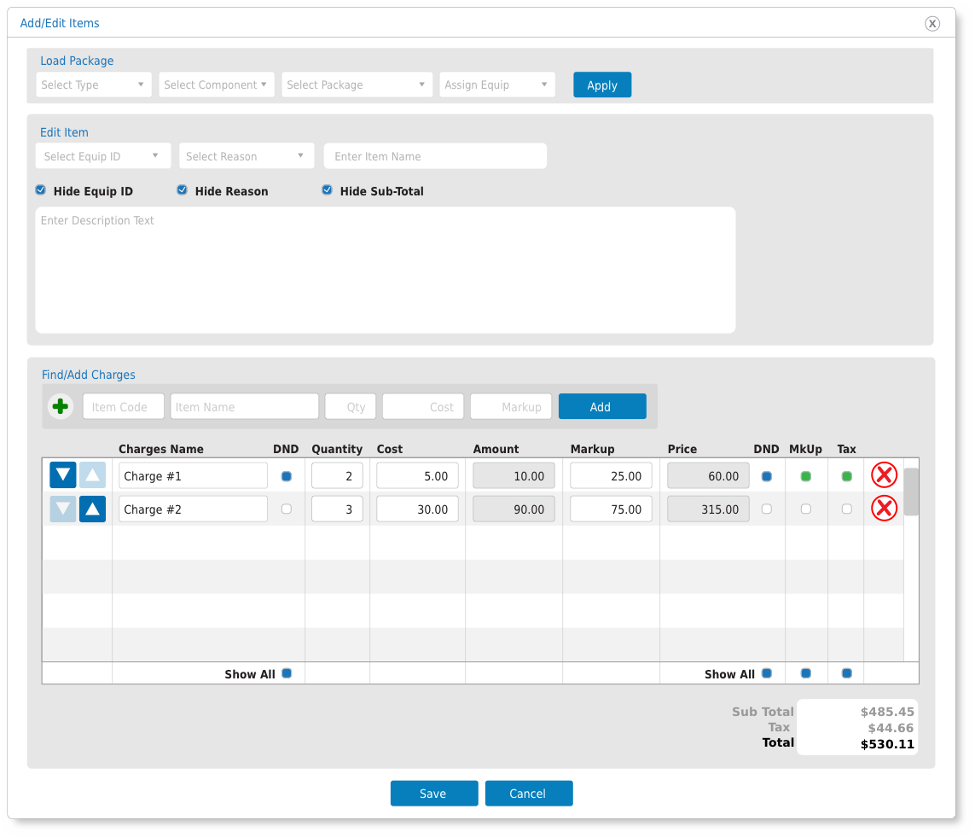
All changes to items and their related charges are done through the popup editor. This editor will allow the web user to edit and manipulate the information related to the item and all assigned charges shown on the proposal. In addition, a number of fields can be hidden by utilizing checkboxes on the popup.
Loading Packages
This section is being updated. Packages are now being sourced from the Flat Rate / Packages web page already in existence in Equipment Manager. The current packages system contains the same information that was being built for Proposal and we can simply utilize the already existing system. Packages contain an item information, scope and related charges. This information will be copied from the packages and Flat Rate Items tables and put into the Proposal tables related. The addition of the component drop menu to be populated as needed will be added to accommodate the existing packages system.

The web user will be able to select an existing type of equipment and equipment or jobsite to assign the template to load. Once the settings are chosen, the user will click the apply button and the template information will be assigned to the proposal and show up in the demo. Once the information has been loaded, the user will be able to add and edit to the information.
Like the creation of new items, the user will have the option to select equipment type Job Site and Equipment ID Job Site if they are installing NEW equipment or adding items that are not specific equipment related.
Assign Equip/Items
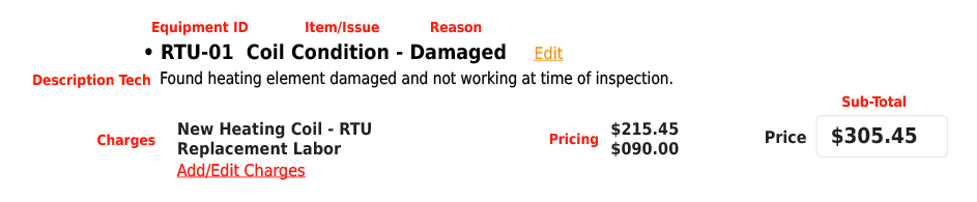
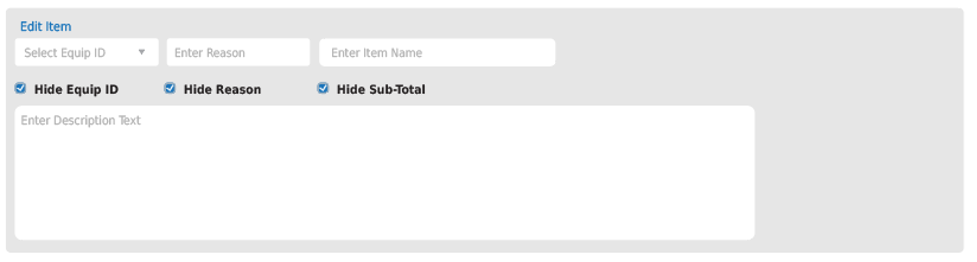
Each proposal is sectioned out by equipment from the identified Job Site. A list of issues are identified and solutions or charges are added detailing how the issue/resolutions are being resolved. The Contractor has the option at any time on any proposal to add equipment and issues to the Proposal. This can be done by selecting the Add Item button and then selecting the new equipment that you wish to add to the Proposal. Once the equipment has been selected, the web user can enter the Item/Issue name related to the equipment. In the description box the web user can add notes as to the details of the issue or notes about the item/issue that they wish to relay to the Client. The Equipment ID, Reason and Sub-Total of all the charges can be hidden from the Client by checking the Hide boxes.
Equipment Type
Some Job Sites may have a large number of equipment listed and there for the option is given to narrow that list down by Equipment Type. Besides the standard 11 types of equipment to be listed, the user needs the option for Job Site. This will come into play if the user is assigning an item that is NOT equipment related.
Equipment ID
This will be the list of equipment from the Job Site. This list can be limited based on any selection made from the Equipment Type menu. This menu is single select. Selecting a piece of equipment will cause the equipment to show up on the mockup to the right. All existing equipment will remain in the menu and the user will have the option of adding the same equipment multiple times as the equipment can be assigned further to a component and each equipment can have multiple components. The user should also have the option to select the Job Site. This will allow the user to assign items and NEW equipment that may not yet be installed on the job site.
The equipment id will be shown on the proposal but the user will have the option to hide the value.
Repair Reason
The repair reason is why the item or equipment needs to be replaced. This is a entry field that can optionally be filled out. The field will appear at the end of the Item/issue name and can be used for a number of ways to relay information.
The Repair Reason will be shown on the proposal but the user will have the option to hide the value.
Item/Issue
Once a piece of equipment has been selected, items can be manually entered. This item can be the issue that is been discovered or any name the user wishes to give the item. The Name needs to be limited to 30 characters.
Description
Notes will be details as to what was discovered. This will include detailed submitted by the mobile user as to why the repair reason was selected. The field needs to wrap with appropriate spacing and the box needs to be limited to about 250 characters.

Assign Item/Charges
Once the issue has been identified, the replacement solution needs to be given, this is done by means of charges. Charges will contain a text name description, quantity and price for completing the work involved in the solution. The web user will be able to add multiple charges to any Item component/issues.
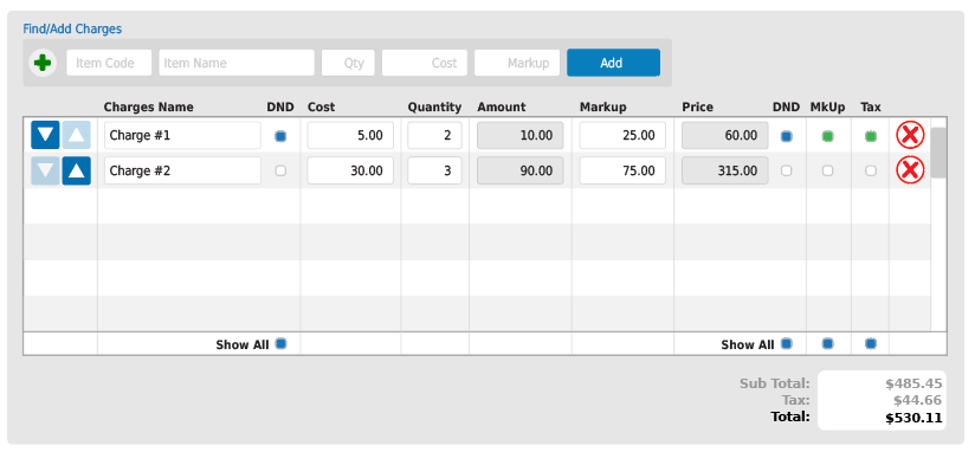
Charge Name
This is where the Contractor will describe the solution to the issue. This may be a description of replacing equipment or a defined description as labor charge.
CostThe cost to the Contractor for the charge.
QuantityHow many of the items are being applied to the item.
AmountA static representation of the Cost times the Quantity.
MarkupThe markup that is compiled by the system based on the Contractor Markup table. This field can be over written by the web user.
PriceThis is the compiled Price computed by taking the Markup times the quantity and adding the Amount.
DNDDo Not Display check box will when checked, allow the related charge information to NOT be displayed on the Proposal.
TaxThe check box under tax will apply tax to the item. If the box is UNCHECKED, NO tax will be charged for the item.
MkUpThe Mark Up check box when checked will tell the system to apply the appropriate markup to the charge cost to determine the appropriate price.
Deleting ChargesCharges can be deleted by clicking on the Delete icon. This will remove the charge with no warning.
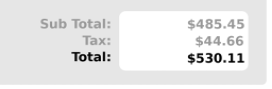 Totals
At the bottom of the popup are the totals. This field will tell the web user the sub-total, tax applied and total of all the charges related to the item.
Saving Proposal
In order to force the web user to save the latest changes to the proposal, certain elements of the proposal will be compared with the database itself to see if the elements have been updated. If this is the case, the PDF and email/web aspects of the proposal will be out of date and need to be updated. These aspects of the proposal are refreshed and generated by the web user SAVING the proposal. This is why when the user makes any changes to the Charges, the page needs to be SAVED and refreshed.
Submission Options

Submitting the proposal to the Client involves emailing a link that will take the Client to a web page allowing them to interact with the Proposal, accept or deny the charges that have been proposed. Before sending an email, the web user may desire to view the proposal for edits and updates. This can be done with the View PDF button and the View Web button.
The View Web button will generate/update and display the web page version of the proposal. This web version is what the Client will see when they click on the email link that will be submitted to them.
Contractor Profile – Proposal Settings
The proposal settings page will allow the Contractor to assign text as a default to load in certain specified text boxes and fields for new proposals.
Default Text
The default text area allows the contractor to set up text that will appear in specified boxes when the page and popup boxes load. These boxes are the Proposal Terms & Conditions, the Proposal Email Body text and the Reminder Email body text. Each of these has a text editor that allows the web user to customize the text for the related item. The default text option allows the Contractor to enter text that will load as the default to the editor saving the web user from having to type in general text. The idea is that the web user will simply have to change small details.
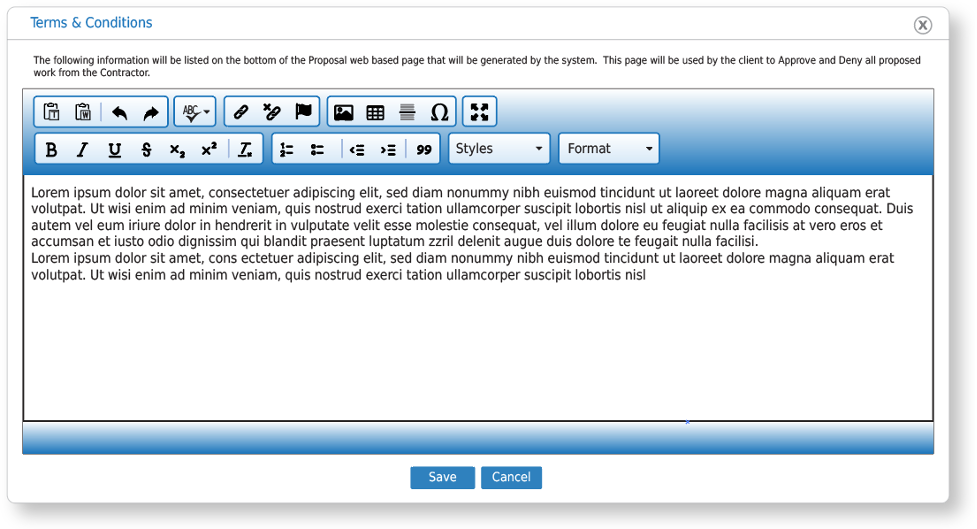
Proposal Terms & ConditionsThe access to the proposal terms and conditions is located on the main proposal editing page. In the center section at the top under Replacement Details is the Terms & Conditions button to the right side.
When the button is pressed it will launch a popup that will allow the web user to enter and edit the terms and conditions for the web based proposal. ¬¬The terms can be found on the web proposal by clicking a link at the very bottom of the web page.

Clicking this link will pop up a box showing the terms to the web viewer.
Proposal Email BodyThe proposal email body text will show to the Client when the Contractor emails the Client the proposal. As part of the email of information for the proposal is the email the content comes in. This email has a body of text allowing the Contractor to explain details of the emails contents and proposal to the Client. When the Contractor web user selects the Email button at the bottom of the Proposal demo, a box will popup asking the web user for details about who to email, the subject and the body of the email.
This body text will be preloaded with the default. This text will show up at the top of the email that is sent out to the Client informing them that a new proposal has been generated by the Contractor.
Reminder EmailThe reminder email will inform the Account Manager that a proposal under consideration may need to have more action taken. This email will be set up by the web user on the main proposal page. The system will run a CRON daily that will generate new reminder emails that can be sent to the Account manager. The web user has the option to specify text an a text box that will become the body of the reminder email. The contractor has the option to preload the text from the settings page.
The email generated by the system will be a simple email with the contents that are set in the settings box.
Flat Rate Fees / Packages Tie-In
Packages as explained previously can be created to save the Contractor work at a later date from having to enter all the basic information again. The Contractor will have the option to pull data from the existing Flat Rate Fee/Packages page and load an existing package into a Proposal saving the web user time and allow the user to then make edits to the loaded data on the Proposal page.
All packages can be assigned to an Equipment Type. This will allow the web user to filter the packages and find them easier. This drop menu will contain all 11 types of equipment along with the Job Site option. The Packages drop menu will be a single select drop menu that will list all the packages available to the Contractor taking into account the Equipment Type selection if made. Selecting an equipment type is not required. Once a package has been selected, the web user will be able to click the Load button and the package information will load on the page. At any point if the web user would like to clear the current package data and start a new package they can click the New button.
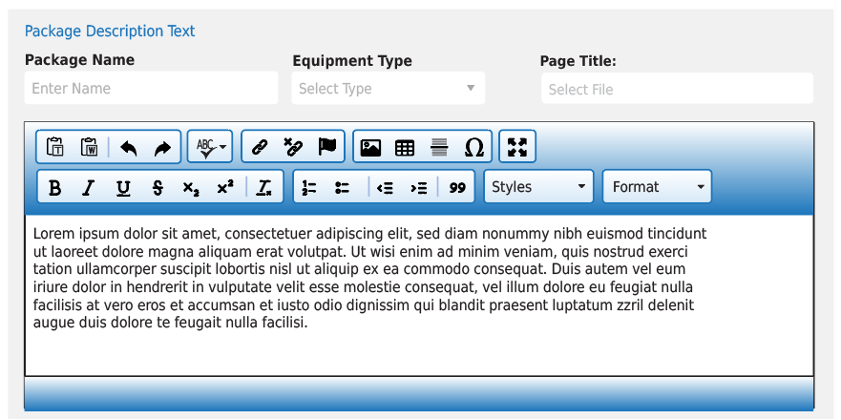
Package Description Text
The second section of this column is the setup for the package. This section includes the Package Name that will be used to identify the package to the contractor. Packages can ONLY be seen by the Contractor that created them. The web user can set the Equipment Type that is associated with the package. To begin setting up the package the web user will assign a Page Title that will appear at the top of the opening text for the package. The Title should explain the nature of the package and text. The opening Descriptive Text will be used to explain the reasons behind the work that is being quoted along with the equipment that is being quoted to be included in the proposal.
Package Items
The second part of the package is the items and their charges. This section allows the web user to create new items and create and assign charges to those items. The web user will also be able to change the order that the packages and charges are displayed.

Clicking on the Add/Edit Charges link will allow the web user to add and edit the charges that are applied to the related item. This will be done through the triggered popup that will appear.
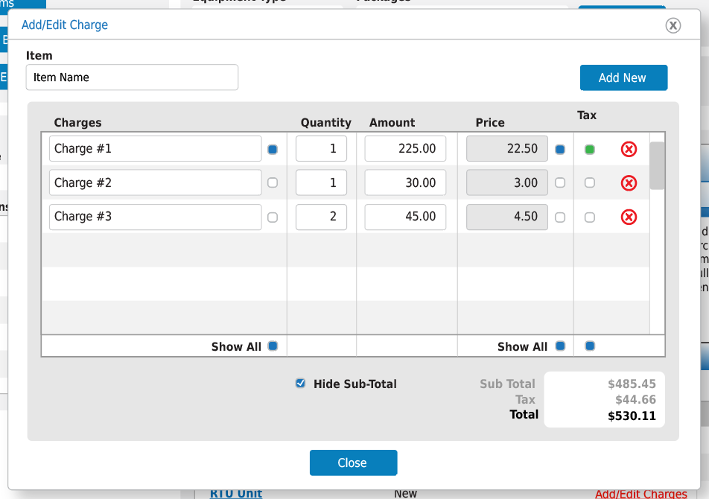
This popup will allow the web user to Add new charges and edit the ones that are already created. The user will also have the option to remove any charges that need. There is an option at the bottom of the box to hide the sub-total related to the charges on the demo and the resulting package.
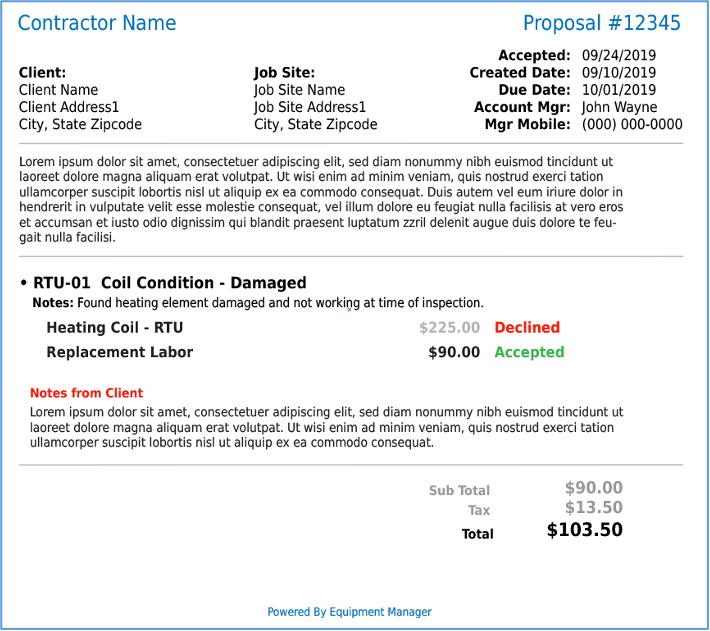
Generating A Proposal PDF
Once the web user has compiled a proposal in the system, the user can then generate a PDF of the proposal. This will be done automatically when the Proposal page is saved. The PDF is compiled of information provided by the web user for the proposal. This information includes Client, Job Site and Contractor information. The Items for the proposal along with the Proposal scope are then used to compile the rest of the proposal along with the terms at the bottom.
The following is a basic rendering of a general proposal PDF.
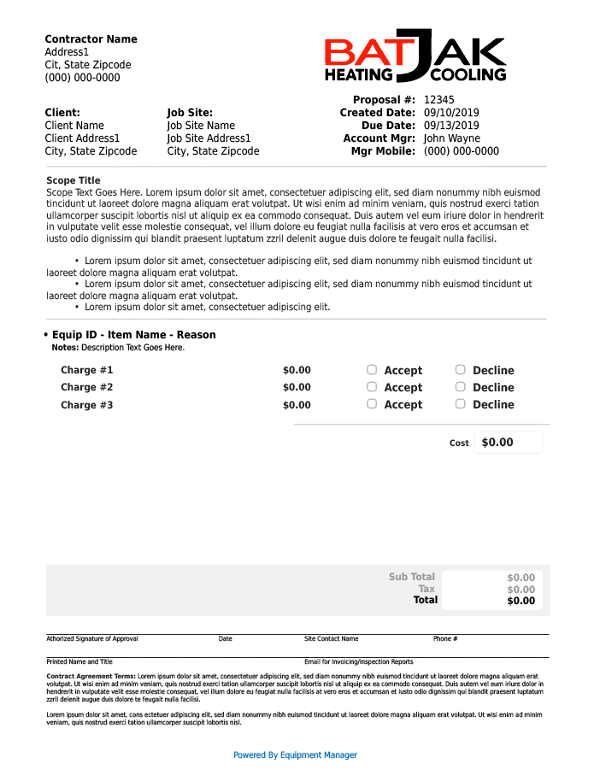
We need to work to see that these pages are set up so that they build as cleanly as possible. The page needs to be divided up into four sections. These sections are Info, Scope, Items and Terms. The info section is static as it does not change. The scope needs to be flexible to account for the changing amount of text that the contractor add to the scope as needed. The Items section should also be flexible to expand as needed. The terms section should be consistent but will be based on the amount of text determined but the Contractor. Items and Terms section needs to be grouped so that they are always on the same page. If they need to carry to a second page to account for expanded Scope/Items text then they will do so.
This document needs to be neat and clean and follow the mockup in visual layout wherever possible. The following are font sizes based on the mockup.
Understanding the Electric Proposal Process
At this point in the process we are going to assume that the Contractor has created a proposal, assigned all the appropriate information regarding the Client and Job Site, added a Scope, Item, Charge and saved the information. Once the proposal has a Charge added and saved, the options for Email Proposal, View PDF and View Web will show up.
Saving the Proposal at this point with charges will cause the system to regenerate the PDF and Web versions of the Proposal upon pressing the SAVE button. Any time the Item is edited and saved, the proposal will be cleared and reset.
Updated Proposal StatusThe status field of the cpm_proposals table will change with certain aspects of the Proposal. This includes starting the proposal as the default OPEN. Once the proposal has been emailed to the client the status will change to SUBMITTED. Once the email has been opened by the Client they will have the opportunity to Accept, Decline or Resubmit the items of the Web Proposal.
At the point the Client makes their choices with all the included charges. The following status variations will apply based on what the Client chooses.
If all items are declined, when the Client presses the Submit Choices button, the proposal status will become DECLINED. The system will generate a Results PDF and the PDF will be emailed to the Client, Account Manager and Estimator.
If the Client chooses to Accept any of the items, the proposal status will become ACCEPTED. The system will generate a Results PDF and the PDF will be emailed to the Client, Account Manager and Estimator.
If the Client chooses to Resubmit any of the items, the proposal status will become RESUBMIT. The system will email the Client, Account Manager and Estimator the results PDF.
Using EM to Email a Proposal
Once the Contractor has completed the building of the Proposal, the Web User will save the Proposal and then click the Email Proposal button.
This button will launch the Email Proposal popup that will allow the Web User to enter all the related Client information pertaining to who is supposed to be emailed the proposal. When the system completes this process, an email will be sent to the adressee that will provide a link allowing them to click and be taken to the Web Proposal. From the Web Proposal page the Client will be able to View the proposal in detail and Accept, Deny or request a Resubmit regarding the Proposal.
All the fields of this popup are required to save the data. This informaton is used by the system to build an email that will be sent to the Client. Once the information is saved, the system will store and send the email. Once the email has been sent, the sysetem will populate the Email Proposal box on the main page with an email address and sent time/date stamp.

The sent Date/Time stamp will link to popup and show the saved Proposal PDF at the time of the sending of the email. The client will then receive an email from the system with all the supplied information.
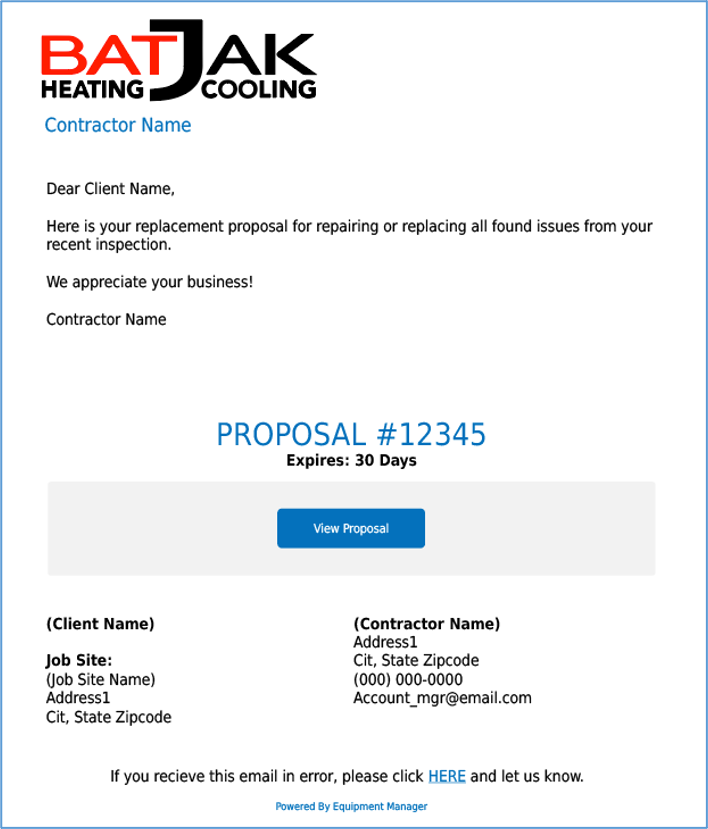
This email will allow the Client to click on the View Proposal link that will navigate then to the Web Proposal.
Web Proposal
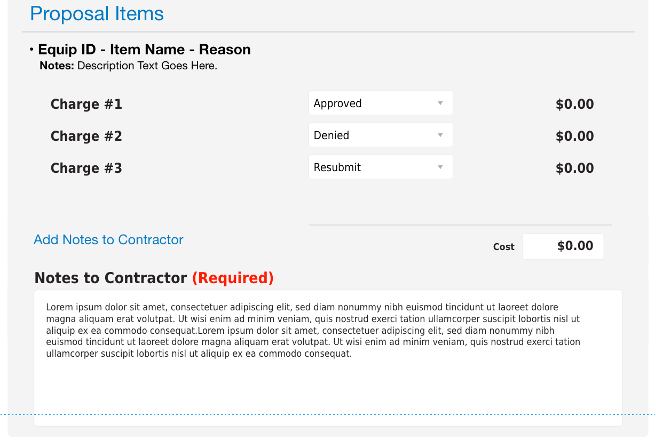
The web proposal allows the Client to interact with the Proposal and choose to Accept, Decline and Resubmit the charges of the Proposal. Each item is listed under the Proposal Items section of the web page. Under the Items information is the listed charges related to the item. Each charge will list the Charge Name, a drop menu allowing the Client to give a response to the charge, and a Price.
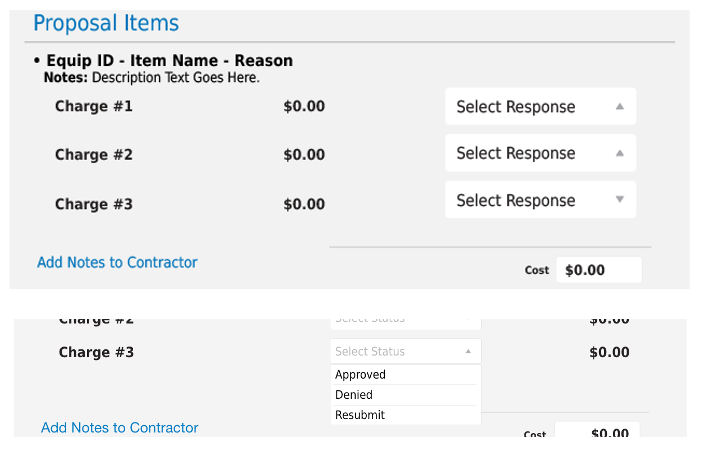
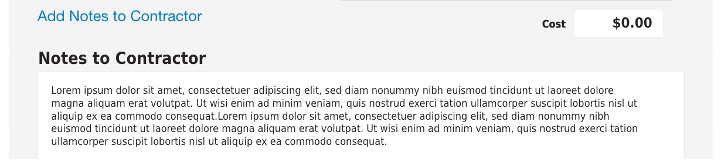
Under the Charges will be a link for the Client to add a note to the Contractor. This notes field that will show when the text Add Notes to Contractor link is clicked is optional to the client unless one of the Status drop menus has a status of RESUBMIT.
Under the Notes and Cost fields at the end if the Items list will be the Approve Proposal button and the Totals Box. The Approve Proposal button will ONLY show up when ALL charges for ALL items have a selected status. If Any status is RESUBMIT, the button will change to Request Resubmit.

If the Client chooses a Resubmit status, the Add Notes to Contractor field will show and be required in order to submit the Proposal.
At the point the Client makes their choices with all the included charges. The following status variations will apply based on what the Client chooses.
If all items are declined, when the Client presses the APPROVE PROPOSAL button, the proposal status will become DECLINED. The system will generate a Results PDF and the PDF will be emailed to the Client, Account Manager and Estimator.
If the Client chooses to Accept any of the items, the proposal status will become ACCEPTED. The system will generate a Results PDF and the PDF will be emailed to the Client, Account Manager and Estimator.
If the Client chooses to Resubmit ANY of the items, the proposal status will become RESUBMIT. The system will email the Client, Account Manager and Estimator the results PDF.
Totals Box
The totals box needs to be interactive to the status drop menu. The box needs to be tallied based on the price of all Charges of all the Proposal items. If the Client DECLINES a charge, the price needs to be subtracted from the subtotal. If the Client chooses to RESUBMIT an item, the subtotal should become $0.00.
A Status is required for ALL charges before the Client should be able to submit the web form.
The Web Results Proposal PDF
Once the form is submitted, the system will create a NEW PDF with the results. This will include the Status of all Charges, Notes to Contractor and the Totals.
This new PDF will be emailed to the Client, Account Manager and Estimator. Once this is complete, the system will then display the new data on the Email Proposal box on the Edit Proposal page. This new Response Date/Time data will be hyperlinked to the Results PDF.