
Home Page
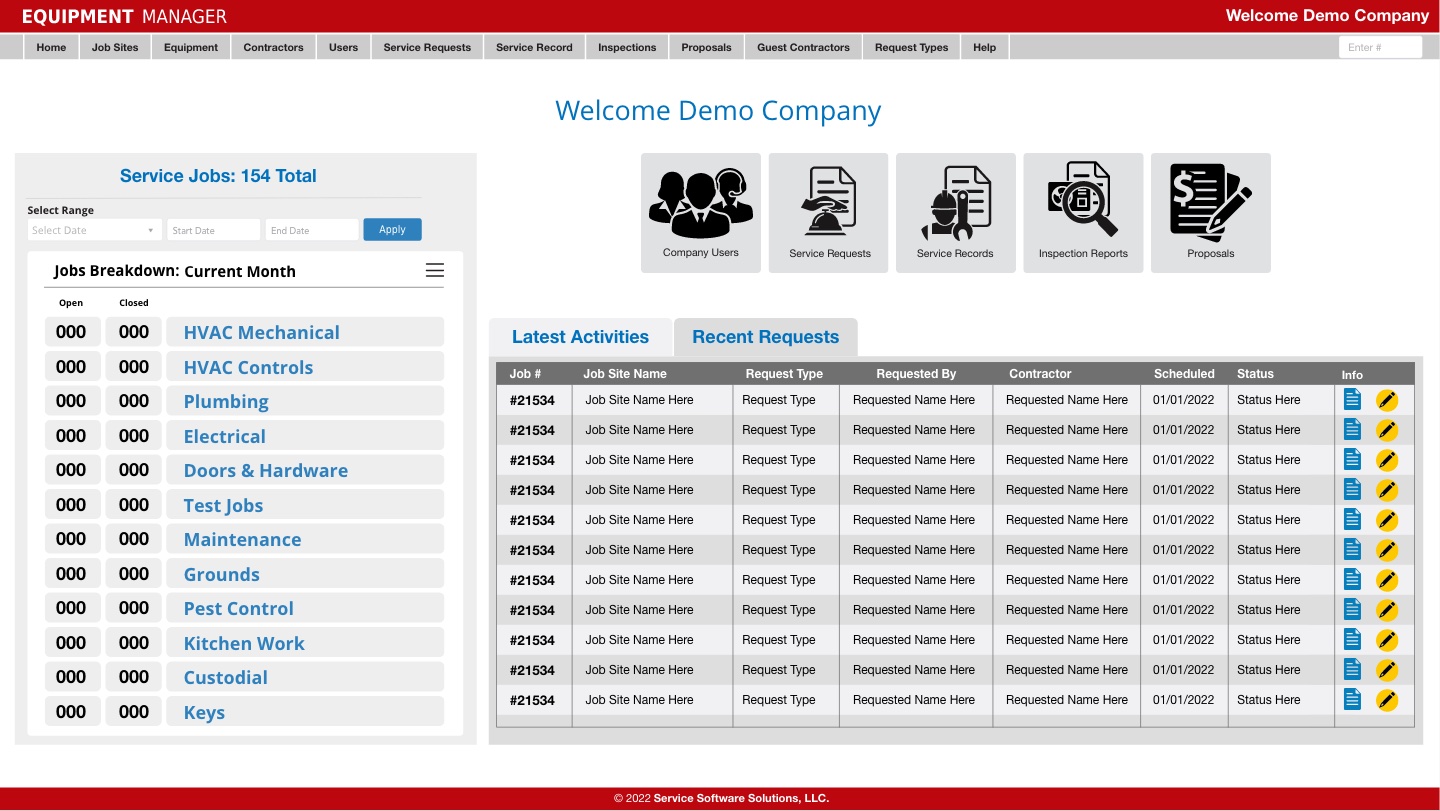
When a portal customer logs into the portal, they are taken to a landing page with information and links. This page will very in the information displayed between Customer user types. The higher the Customer user level the more information is displayed.
Button Quick Links
On all the user screens you will see a series of Gray and Black icon button that will quickly take the user to different key pages of the Customer Portal. These icons will change according to the access level.
Request Type Listing
On the left side of the page will be a listing that will inform the user the number of Service Jobs that are entered based on the specified time frame. These jobs will be sectioned by the Request Types that have been set up by the Customer in the Portal. The Admin will see all jobs entered for all Customer related Job Sites. The Manager will see all jobs entered based on the Job Sites that are assigned to the Manager. The Basic User will simply see the jobs that have been created by the user.
Activities/Requests Table
On the right is the Activities and Recent Requests table. The Activities tab will show the user the most recent activities recorded by the system from the Guest Technicians working on jobs. When they arrive, when they start, when they submit requests, inspections and when they complete a job. These activities are only recorded for the Guest Technicians using the Guest App. The Basic user will not see this tab.
The Recent Requests tab will show the user all the most recent request based on the type of user. The Admin will see the 30 most recent requests related to all Job Sites. The Manager will see the 30 most recent requests related to the Job Sites assigned to the Manager. The Basic User will only see the 30 most recent requests entered by the user.
The Home screen is where you will do most of your starting work. Users will see button options across the stop according to their user level and permissions. If you do not see buttons across the top, that is ok, just means you have limited permissions based on your resposibilities. Typically most users to the portal will be BASIC users and will only see three things on the home screen, Create Service Request button, a pie chart listing showing you what type of jobs you have created in the past and a Recent Jobs listing showing your the last 20 jobs that you have created.
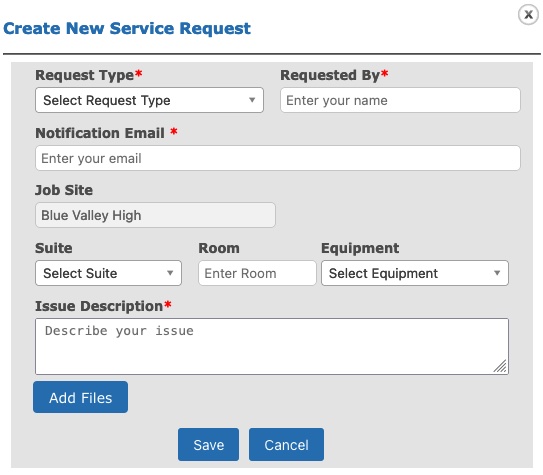
To create a new Service Request, simply click on the Create Service Request button at the top. This will launch a popup that will allow you to enter basic information about your issue. The following data needs to be collected for each Request that is entered.
Request Type - The types are established by your Customer Admin and you should choose the one that best matches the type of work related to your issue.
Requested By - This is where you need to enter your name. Please try to enter first and last name.
Notificaiton Email - You need to enter the email you wish to be notified at. Notifications will be sent by the system when your job is assigned a technician and also when the job has been completed by the technician.
Suite - The suite is optional, if you know the hall, wing or section of the building related. If not, just leave it blank.
Room - The room number needs to be provided if all possible. Please enter the room number only. (101 or 101A) Please do not type in associated names like Bob's Office or Ms Smith's Room. The system remebers the room numbers and names can regualarly change.
Equipment - The equipment drop menu will show the equipment available to the building. If you know the Suite or Room, the equipment list will filter accordingly. If you do not know the equipment, leave it blank.
Issue Description -This is where you will describe the issue that your asking to be resolved. Please be as detailed as possible to save others time asking for followup information.
Add Files - You can add images and PDF files to your request to help the Admin and Technician better resolve your issue.
Once you have completed the form, you will need to click the SAVE button at the bottom. Your Request will then be saved and you should see the new request show up in the listing on the Home page. Once your Admin has assigned a Technician to your job, you will recieve an email to the Notification Email you entered with the request. Once the job has been compelted by the technician, you will receive a notice email from the system explaining that your issue was resolved.
At any time, you can check the Home page to see the Status of your job.
